 |
 |
 |
 |
 |
 |
|
MAKING FLUTED POINTS WITH THE SOLLBERGER JIG By Woody Blackwell
Sollberger and Photographs courtesy of Dave Rauschenberg Side 1
Side 2
Fluted points are one of the highlights of lithic technology. We all know that they date to the earliest known occupation of the Americas, but for a variety of reasons, the reproduction of fluted points ended about 8,000 years ago. That is, until a few master craftsmen such as Don Crabtree and J.B. Sollberger began to attempt replications several decades ago. Now there are almost as many fluting techniques as there are modern knappers, but one of the earliest methods is arguably the most successful. Working almost entirely on his own, J.B. Sollberger spent many years perfecting the three components of his technique: the preform, the platform, and the jig. (From here on, I'll refer to 'him' as J.B: - due to my mediocre typing skills and not a lack of respect for this quiet genius). Besides being one of the best knappers of our time, J.B. is also extremely generous in sharing his discoveries. This article and the one to follow, is based squarely on the techniques he developed and then taught to a new generation of knappers. I was very fortunate to have been one of them. Now that credit has been given where credit is due, let me say that I'm better at showing than at explaining. If this article confuses the daylights out of you, grab me at a knap-in and I'll be glad to try to clear things up. The Waldorfs also have a video available which has a section on J.B.'s fluting technique, which is also called the "Sollberger Jig". The first thing to tackle is the preform. This is a three dimensional challenge. Although there is considerable variety in the size and silhouette of Clovis points made with J.B.'s technique, they all share some common traits in the preform stage. Those traits deal with the cross-section and contours, which we'll cover now. First off, make the preform as smooth as possible.
Basically, the preform should be bi-convex with across-section in the ballpark of Fig. 1. If you want a flute that goes to the tip, keep that cross-section from one end to the other. Preforms, with flattened cross-sections usually fail: the flutes run wide and cut through to the other side (this is not good).
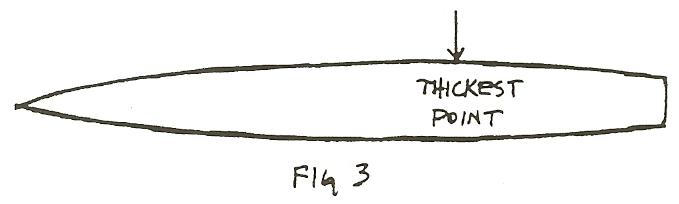
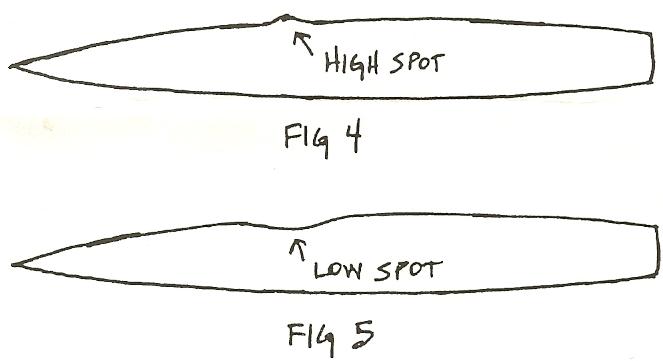
Also, that high spot should be between 3/4" and1 & 3/4"from the basal edge, depending on the length of the preform. One of J.B.'s rules of thumb was that the high point ought to be about 1/3 of the way back from the base to the tip for very long flutes. Lengthwise, both high spots and low spots can cause a flute flake to stop (see Fig. 4 & 5). If that's your intention, great; you can use high and low spots to control flute length, but your flutes will terminate differently. A flute stopped by a high spot will result in·a hinge fracture. A flute that ends in a low spot will typically ''feather out" . Personally, I prefer a steep hinge, similar to the points from the Lamb and Vail sites.
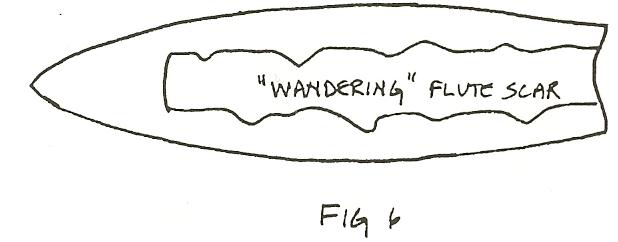
If it's a long flute you're after, don't try to "blow through" a high spot. You're likely to get a much shorter Clovis when the flute dives through, cutting your preform in half. If you can't lower the high spot with pressure flaking,try grinding the high spot down with a fine abrader. Don't try to flute into a concavity that occurs in the first inch or so of the preform. I speak from experience: it will be a disaster. One of several things may happen, all of them bad. If the preform survives, you will have a Clovis with an extremely short flute. At worst, you'll have a two piece Clovis. I recommend extensive "remodeling" of that preform face to build proper contours. A few more minutes of pressure flaking may save a couple of hours' work. But more importantly, it may save that nice piece of stone. To develop the side to side contours, I run at least two passes of pressure flaking on each face after all percussion work is done. Deep gouges and high spots behind hinges will result in flute scars that ''wander'' as in Fig. 6. A smooth preform will give you a flute scar with relatively straight sides. By J.B.'s exacting standards, the straighter the better, as that indicates finer workmanship. (There is another factor which can affect flute scars which will be covered in another article).
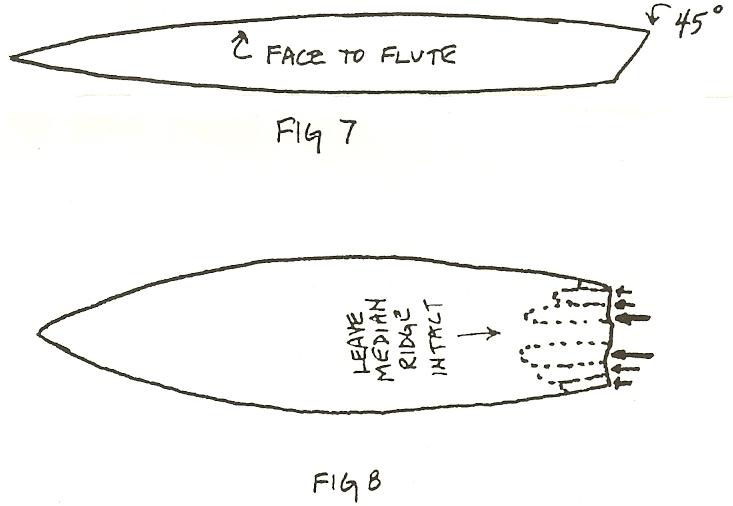
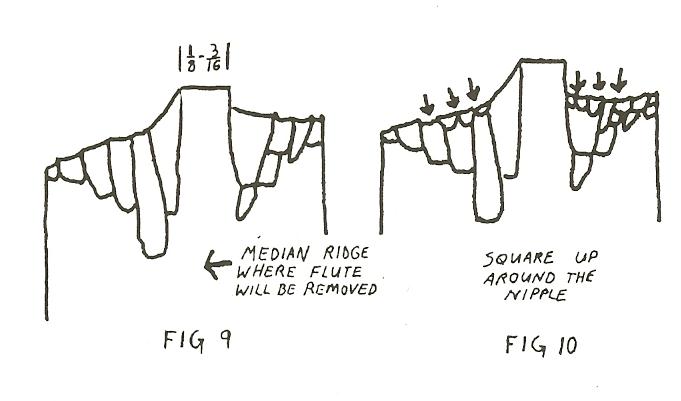
At this point, you should have a preform that is close to the final silhouette you're after. Clean up any remnants of pressure flaking platforms that might be left on the edges, double check the contours, take another bite of the cheeseburger you bought two hours ago, and get ready to build the fluting platform. The first step in making the platform is to pressure flake a 45 degree bevel across the base (Fig. 7). This might take several passes. Flake away from the face you intend to flute. After grinding lightly, drive pressure flakes on the face you want to flute from the basal edge toward the tip of the preform. Do not flake down the median ridge: leave that part of the basal edge alone. That's the area you're trying to isolate: it will become the platform, also called the "nipple". Take short flakes near the preform's basal, corners, as that area is thin and fragile. As you approach the midline, you can get aggressive and remove a lot of material (Fig,8) ). If you need to, regrind the two sections of the basal edge and take more pressure flakes. Basically, you're now beveling in the opposite direction. The goal is to leave the median ridge/nipple intact and "high and dry" -meaning well isolated from surrounding material.
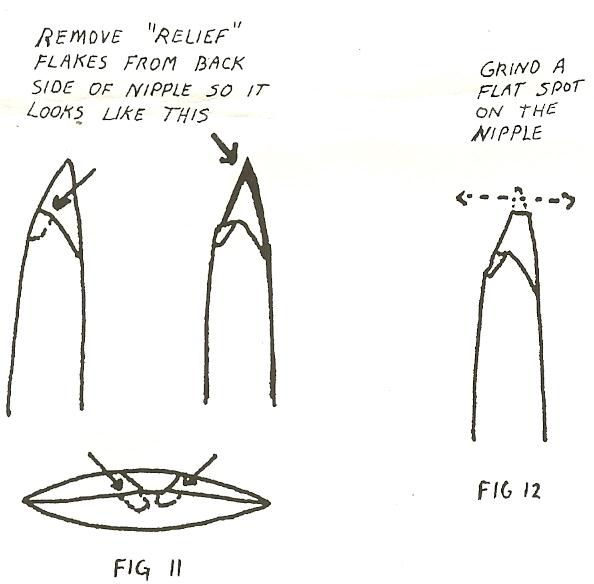
Now for the little part of the basal edge you left intact. It should be between 1/8" and 3/16" wide (Fig. 9). With a sharply pointed pressure flaker, gently "square up" the area around the nipple (Fag. 10). With the same sharp pressure f1aker, you need to take at least two flakes off the back side of the nipple (the side you're not trying to take the flute off of right now). Start the flakes at the "corners" where the back of the nipple joins the preform. Run the flakes toward each other, it may take several flakes and some delicate "nibbling" to properly relieve the platform. Clear as mud? See Fig. 11, which might be easier to understand. These important little flakes relieve the back side of the platform and should reduce the thickness of the platform by roughly half. Because it's impossible to make identical platforms every time, generally, a wide platform should be thin;conversely, a narrow platform should be thick. The quality of the material is a player here, as very "tender" material requires a stouter platform.Obsidian, for example, requires some of the heaviest platforms, meaning both wide and thick. Determining the optimum platform size is a skill that will come with practice. Keep in mind that the object is to build a platform that will absorb/store a great deal of energy (pressure) and then release"cleanly" (meaning the right place at the right time), allowing the flute to travel down the preform at the proper depth and speed. Now with the finest grinder you can get your hands on, you need to grind a flat top on the end of the nipple. The flat spot should be roughly at a 90 degree angle to the centerline of the preform. You also need to grind a flat spot on the opposite end -the pointy end that mastodons worried about. And then lightly grind the edges of the preform in the hafting area. In the next article, I'll tell' you what all this grinding is about. I'll also describe the Sollberger Jig. Although my friend (and fellow fluter) Joe Miller might tell you that the Sollberger Jig is a traditional Swedish folk dance,it's what you need to flute the preform you just learned to make. After you have made your first good Clovis though, I guarantee you’ll definitely feel like dancing.
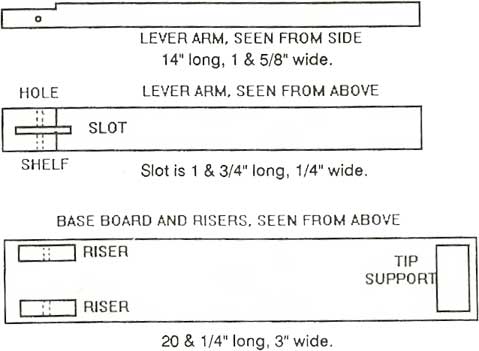
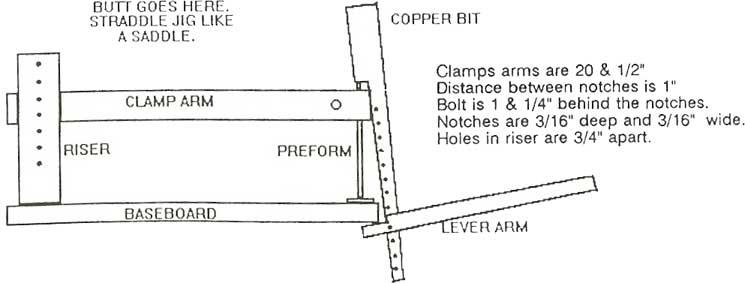
THE SOLLBERGER JIG Part II By Woody Blackwell “D.C., there’s only one thing from your drawings for Part One (Chips Vol. 6 #2) that I suggest changing. The back of the platform needs to be "released" a little more than as drawn. The flakes that are removed from the bottom corners of the nipple need to meet behind the nipple, or better yet, overlap."-Woody Blackwell. In April, a vague article on the Sollberger Jig appeared in Chips, Vol. 6. #2, (Blackwell:6-7). Let's say you spent an hour or two trying to make sense of it. Now let's assume you are still interested and want to build a jig of your own. Boy, are you a glutton for punishment, but don't let me try to talk you out of it. Read on. In the first article, we looked at the preform. In this one we'll take a quick look at the jig. Let me stress this up front: although there are fairly close guidelines to follow to build a good preform, jigs can be virtually any size or shape. The jig's purpose in life is pretty simple: to hold the preform steady while pressure is applied to the platform; with such a broad purpose, there's plenty of room for innovation and creativity. If you want to simply copy the drawings, that's fine, but I encourage you to experiment: improve on the design, use different materials, or be even more creative. I've thought about making a jig which looks like a mastodon, in which the preform would be held in the tips of the tusks. J.B. Sollberger is the Einstein of the jig. I don't know how many spectacular points he has fluted (and he may not know either) but it's undoubtedly in the multi-thousands. His jig looks like the product of an inspired tinkerer (which it is). It's made of whatever he had laying around his garage: there's tongue and groove oak flooring, sections of broom sticks, twine, hose clamps, ‘C’ clamps, a copper pipe, and good intentions. My point is, the tool doesn't need to match the product, technique is what J.B. taught,and hopefully, I can get a little of it across too. In order to get us all using the same vocabulary, here's a diagram of my jig. There's nothing magic about the dimensions -- it just happens to fit me pretty well. If you happen to enjoy food and have a lifetime accumulation of apple pies, mashed potatoes, and chicken fried steaks spread around your mid-section, you might want to make the jig a little longer so you can see the end (my wife suggested that I make mine a couple of inches longer and add a tractor seat. What a funny girl!) . Use a good hardwood to build the jig. I've used cherry, maple, white oak and ash and all worked well. Joe Miller has a gorgeous jig made out of cocobolo, a brilliantly colored exotic wood from Central America. Mike Peterson of Laramie, Wyoming has an industrial strength jig made from inch thick machined aluminum. I think the only guideline is that you should avoid soft materials that flex too much or get dented easily. Also, I've used wood that was about an inch thick, although 3/4" wood would work just as well. The tip support should be made of a material that is solid and able to take a lot of pressure, but not so hard that it breaks the tip off the preform. I use a small piece of antler from a moose palm. I've also seen some made of dense plastic and aluminum, but antler is my personal choice. My bit is made of 1/8" copper sheeting which I bought from a metal supply house. A retired machinist cut it and drilled the holes for me, although it's possible to cut it with a hacksaw. J.B. 's bit was made from a copper pipe which he slit lengthwise with a hacksaw and hammered flat. He also had a second bit with an antler tip on it, which was held in place with hose clamps. J.B. felt that his success rate with Folsoms was much greater when he used the antler tipped bit. The lever can be of most any material, but I use wood that matches the rest of my jig. You need to drill a hole through the narrow sides of the lever. Center this hole: the hole may split out when pressure is applied if the hole is too far to one face. You also need to put a slot in the same area, except the slot goes through the wide faces of the lever, (see drawing). The copper bit will go through the slot and a galvanized nail is the fulcrum for the lever, it's important that you use a nail that won't bend. That's why I recommend a galvanized nail, which you can buy at virtually any hardware store. You should also cut a shallow "shelf" on the lever in this same area. It's not essential, but the end of the shelf serves as a stop, keeping the lever from sliding under the baseboard. Glue soft leather into grooves near the end of the clamp arms. The leather is there to provide a soft but firm grip on the preform as it's fluted. The leather I use is about 1/8" thick and has a suede-like texture. The leather alone won't hold the preform securely during the fluting process, so use some kind of clamping or tightening devise. J. B. puts a C-clamp behind the leather. I have a threaded bolt that goes through both the clamp arms; a wing nut tightens them around the preform. Don't go overboard with the tightening. Just get it finger tight and then snug it up a touch more. If the preform is held too tightly, the extra pressure may snap the corners off the preform. My riser has a lot of holes drilled in it to accommodate preforms of varying lengths. The trick here is to keep the preform at a 90 degree angle to the baseboard. Place the preform in the clamp arms and try various positions in the riser until the preform looks like its closer to 90 degrees. You can make the risers any size you want, just so they're slightly taller than the largest point you think you'll want to flute. The point here is that one jig can be used for all sizes of fluted points -- Folsoms to Cumberlands to Wenatchee-size Clovis. Now we're ready to hit the "on" switch and fire the thing up. You clamped the preform securely in the arms after you ground the basal edges lightly and ground the tip. The preform is at a 90 degree angle to the baseboard. The lever's shelf goes under the baseboard and the copper bit goes on the nipple. Being the consummate craftsman, you carefully ground a flat spot on the nipple and now you make sure the bit sits flat on the nipple -- if it doesn't, you file the bit to match the nipple. Looking from the side of the jig, place the copper bit at about a 10 to 14 degree angle to the preform (it varies according to preform length -- the longer the preform, the lower the angle). And incline the lever a little, as it will be easier to push down. Put the whole contraption on something solid, study and flat. Climb on and get "comfy", keeping in mind it's not your favorite recliner. Lean over the preform and make sure the copper bit and lever are centered on the preform. If they’re off to one side, the flute will probably run that way too. Now comes the finesse, lightly hold the top of the bit in one hand and put gentle downward pressure on the far end with the other hand. While holding the bit in place, gradually build up downward pressure with the lever. Once there's enough lever pressure to keep the bit in place, begin to apply very slight outward pressure on the bit -- just enough pressure to make the copper bit clear the preform when the nipple releases. How much downward pressure should you use? That's a hard one. You'll have to discover that for yourself, as the answer depends on the material, the way you built the nipple and the length of the lever. I feel I have too much pressure when my lever arm starts to shake. Joe Miller says the pressure is too high when he bends the lever like a rainbow. Mike Peterson, with his federally-licensed atom smasher, can reduce a nice piece of Pedernales flint into neutrons and protons. With experience, you'll find the upper range that's right for you. Just be prepared for the frustration of a learning curve. You'll break a few nice preforms. Maybe even a lot of them. Once you've completed a few killer points though, you'll be hooked. I strongly recommend that you learn with a material that's readily available and inexpensive, like obsidian. Obsidian, being a little unforgiving, will also force you to learn good knapping skills, such as control and accuracy. And don't believe the PaleoIndians didn't use it -- there are thousands of obsidian fluted points and even entire sites filled with almost nothing but obsidian. Just do yourself a favor. Until your fluting skills catchup to your fervor, hide the Flint Ridge, the Knife River,Crescent and root beer chert. Give yourself at least a year to get a good grip on this technique and then go for it. Now, let's look at some of the common problems, and what might be causing them, and what you can do to cure them. PART III PROBLEM SOLVING I hope that some of you have built your own versions of the Sollberger Jig and have started to make fluted points. If you're working alone without the expert guidance of a master knapper like J.B., you may have encountered any of a number of different problems. While I don't pretend to know the solutions to all the problems involved in fluting, in this article I'll try to discuss some of the more common problems and what may have caused them. One corner of the basal edge broke off. This is a pretty common one for me. Several things could be the cause: first, check the clamp arm. The slots which hold the leather pads should be exactly opposite each other and parallel. If they aren't, they could torque the preform as clamping pressure is applied. If the clamp arms look okay, check your preform: are the ground edges nice and straight? If not, the result is uneven clamp pressure. A third possible explanation is that you used too much outward pull on the copper bit: make sure you aren't pushing outward too hard with your hand that's holding the top of the copper bit. And if you're making a Folsom, the preform may have been too thin: you might have exceeded the tolerances of the material. Deep undulations in the flute channel. Well, at least it fluted. Dig around in the débitage pile and find the nipple . I'll bet dollars to doughnuts it's awfully stout. You probably had to use a lot of pressure, both downward and outward, to get the nipple to release. And when it turned loose, it came off with a bang. Build the nipple a little lighter next time. Make sure it's well-isolated on the backside. And on the face to be fluted, try to run some good relief flakes parallel to the center line. The flute dove and cut the preform in two within the first couple of inches. This is what you almost got instead of the deep undulations. Again, the platform may have been too stout. Also, the arc of the lengthwise contour may have been too great. Don't ask the flute to climb a sharp incline: it will take the path of least resistance -- straight through to the other side. The preform split or cracked lengthwise. It sounds like the platform didn't release. Was it too stout? And did you have an angle of 12 to 15 degrees between the copper bit and the preform? If you used a smaller angle, there may not have been enough out pull to cause the platform to release; because there was a lot of pressure being applied, something had to give. The preform fluted the wrong way, from the tip towards the base. This is an easy one. Assuming you ground the tip well before you tried to flute the preform, there could be a couple of reasons for the accident. First, the tip may have moved during fluting; sometimes that will drive off short flakes. If you've used the jig a few times, check the tip support: it may have some small flakes stuck in it, especially if it's made of antler. Anything hard that's trapped between the point and the tip support may cause flaking. The preform fluted, but the flute was too wide. Probably due to one of two things (or maybe even both): either the preform's cross-section was too flat or the platform was too stout. Find the channel flake and see if you can determine the cause. No flute and the nipple is gone. Sounds like the nipple crushed when you applied pressure with the copper bit. It could be that the nipple was too small for that material. Or maybe you forgot to grind a flat spot on the nipple where the copper bit contacts the nipple. Re-bevel the preform's basal edge, build a new nipple and try again. Short, shallow flute. I suspect the platform released too quickly: a clear case of premature eflutulation. If the flute just barely skimmed the median ridge, there was probably no harm done. Just build a new nipple and try again. If, however, the flute was a little deeper and really degraded the side to side contour, you can re-flake that face to get a good contour and try again. But make sure that the copper bit sits flat on the nipple's ground spot: if the copper only contacts an edge of the nipple, small flakes will be driven off, or the nipple may crush. Edge of the' flute channel wanders, but deep undulations are not present. The preform may not have been very"smooth". There may have been some high or low spots along the edges. Keep trying to make the cleanest possible preforms, which will lead to straight-sided flute channels. Long flute, but the very tip of the preform was cut off. I'm not sure if you should complain or brag. Remodel the tip, grind a flat spot on the end-;-and flute the other side. And hope like Hell it goes that far too! You did everything right, and it broke anyway. It happens. I can't explain it and it frustrates me to no end. But -- and these are good things -- it keeps us humble, preserves the mystery of the stone, and allows us to feel wondrous surprise when everything does go just right. Here are a few final tips. Save your channel flakes. Besides being nice to have, they're valuable study pieces to help determine reasons for failure and success. Before you flute a point, run a piece of Scotch tape down the median ridge to trap the flakes. And don't give up too quickly on the Sollberger jig. Expect some failures. Your success rate may be 20% or less for a while. At best, it will probably be about 80-90%. And as you get better, you may find that your success rate will take another dive when you start pushing the envelope, making paper thin Folsoms or ten inch Cumberlands. I read somewhere that infrequent rewards are the most addictive. I guess some proof of that assertion can be seen in habitual gamblers who loose everything in search of the big pay-off. And then there are lab rats that perform complicated tasks to get a special food treat, even though they may be rewarded only once for every ten times they complete the task. On that philosophical note, this gambling-addicted, silica-snorting lab rat is going to go flute a Clovis point. I feel lucky.
|
|
©2010 J Keffer |
 Good contours are absolutely essential to long, successful flutes, so examine the preform closely both lengthwise and width wise. The median ridge's contour from base to tip should be gently convex.The same goes for the side to side contours.
 Overly steep cross-sections (see Fig. 2) often result in shallow, narrow "skimming" flutes (and you can do better than that -- remember, the whole purpose of fluting is to thin the hafting area). Also, if a long flute is your goal, the thickest part of the preform should be about 1/3 of the way between the base and the tip as shown in Fig. 3. One strong warning: don't create a "steep climb" between the base and the thick section: as I learned the hard way (with about 125 consecutive broken performs), if the climb is too accentuated, the flute will dive, resulting in a cloven Clovis(properly known as a reverse hinge fracture). This is a good way to examine the lengthwise contour: place something long and straight (like your Ishi stick) on the preform's median ridge and then look at the preform from the edge. The high spot (where your Ishi stick contacts the preform) should be 1/16th to 1/8th inch higher than the basal edge. Generally, longer preforms need greater height differences, but differences greater than 3/16"are bad juju .. ,