 |
 |
 |
 |
 |
 |
|
Round Rock Clamp for Slab Saws James C. Keffer
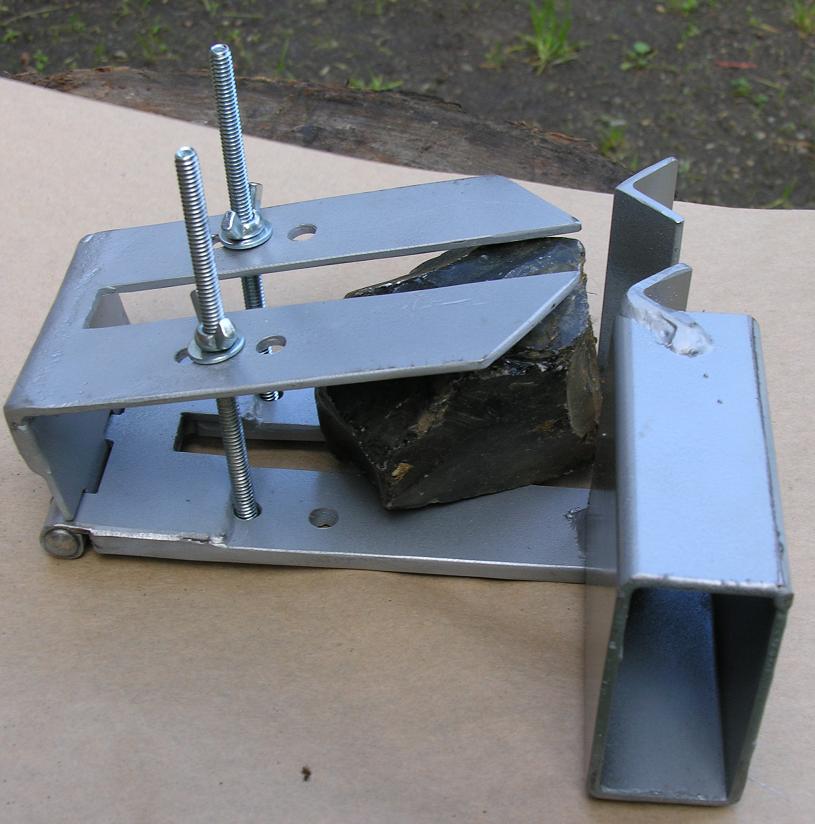
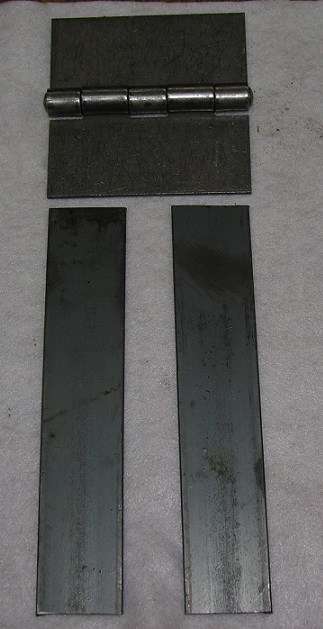
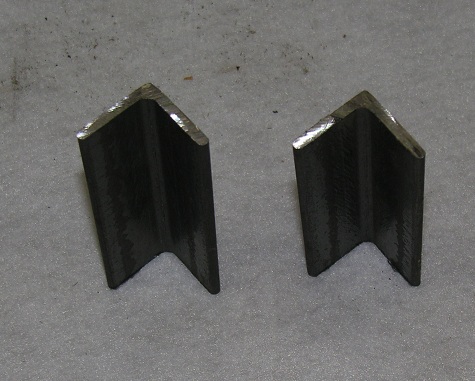
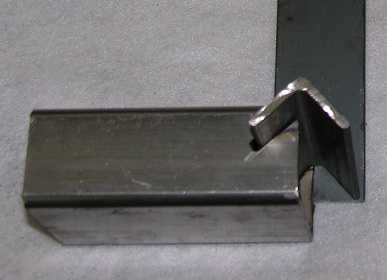
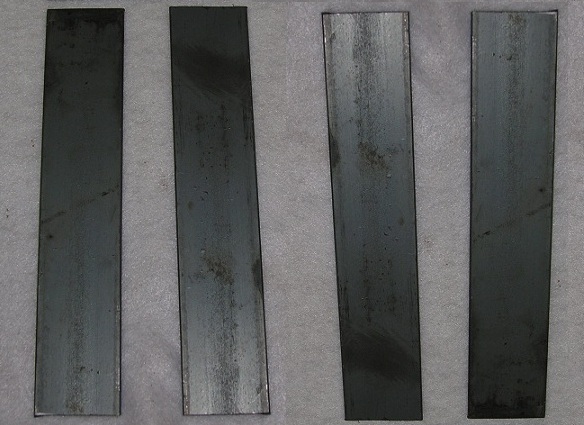
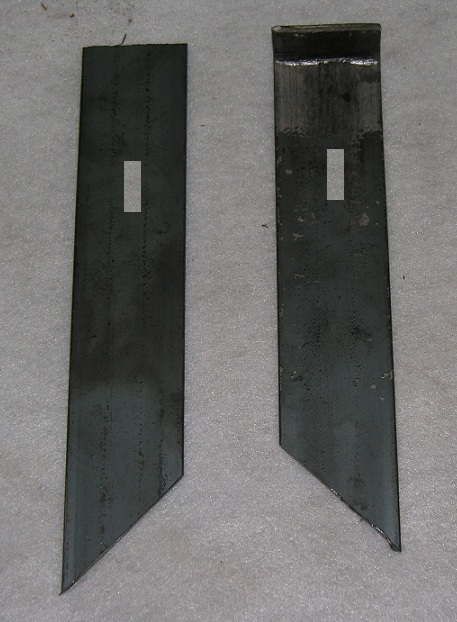
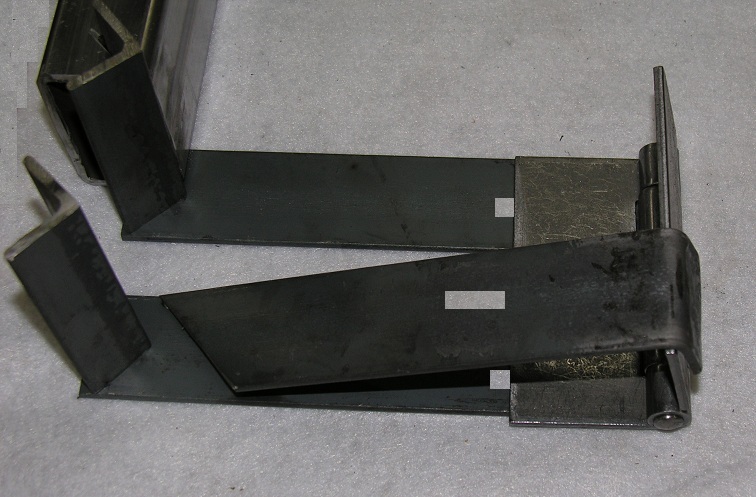
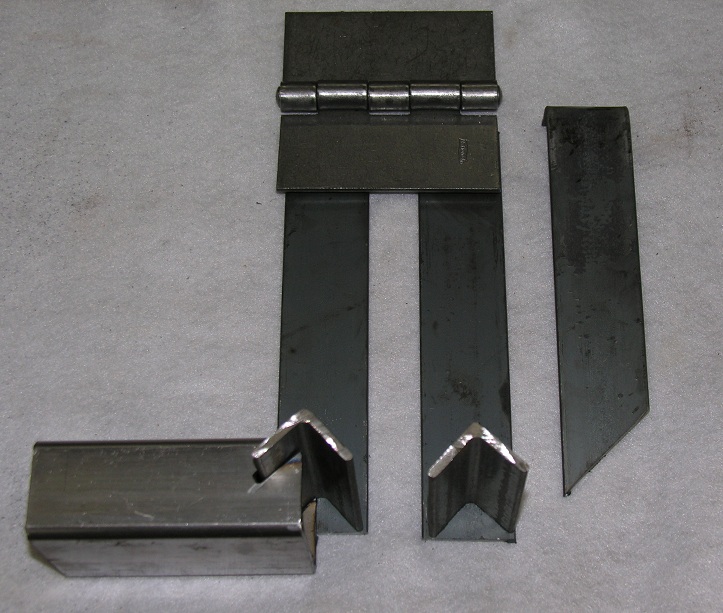
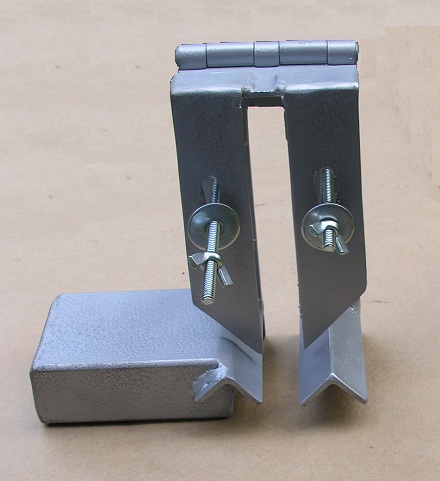
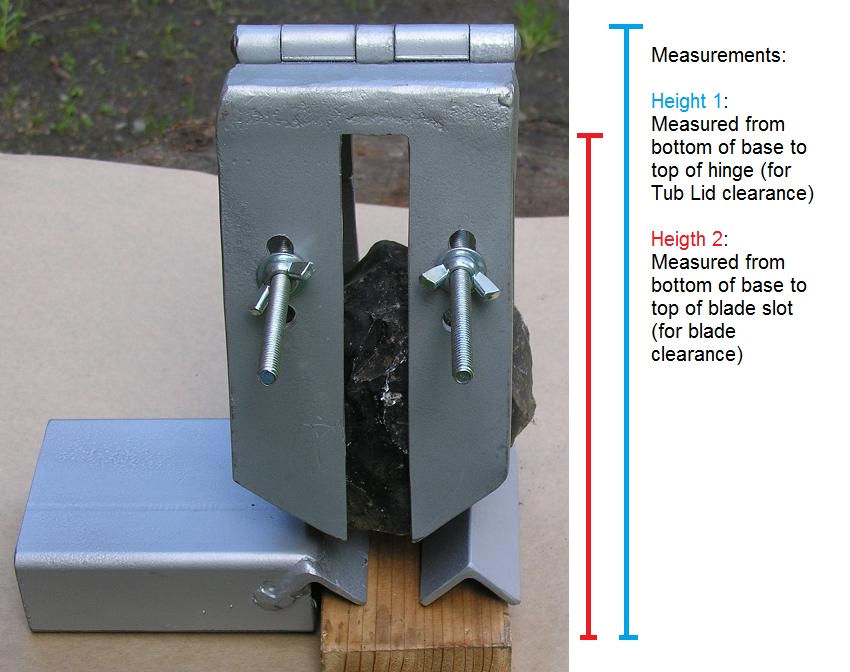
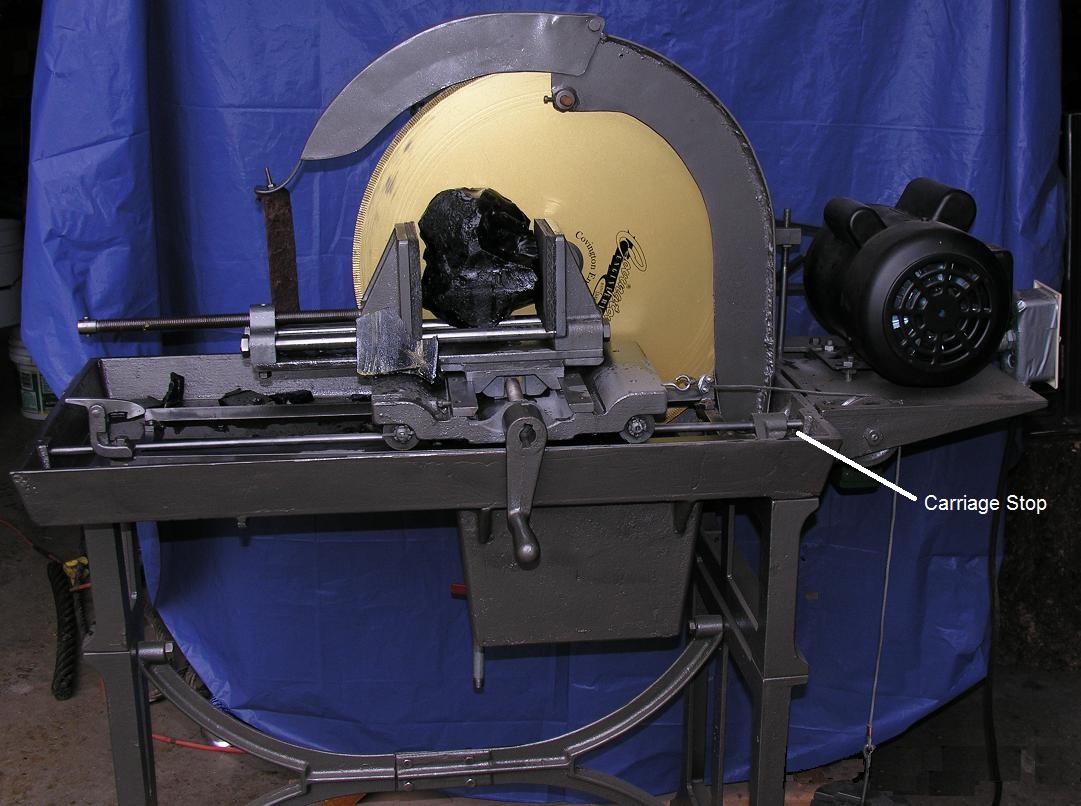
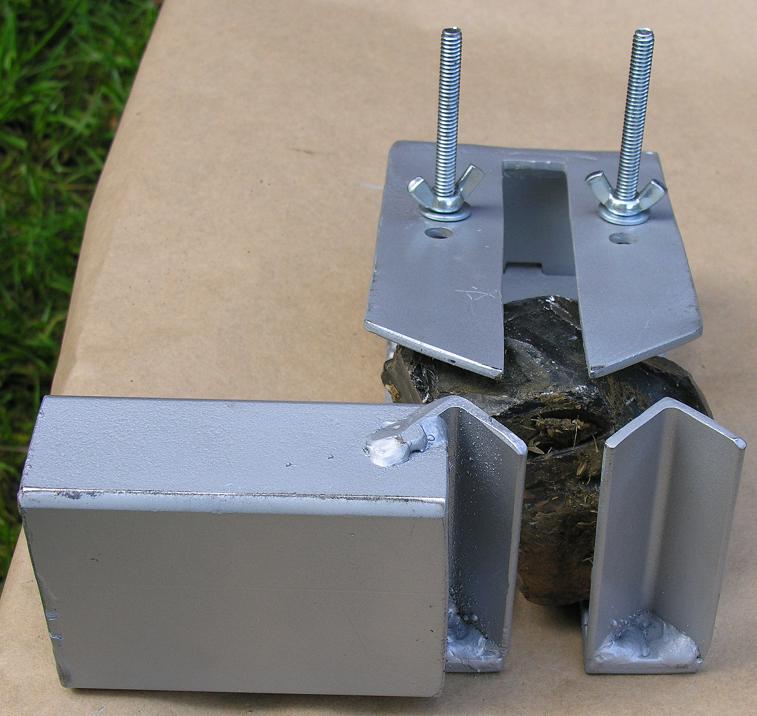
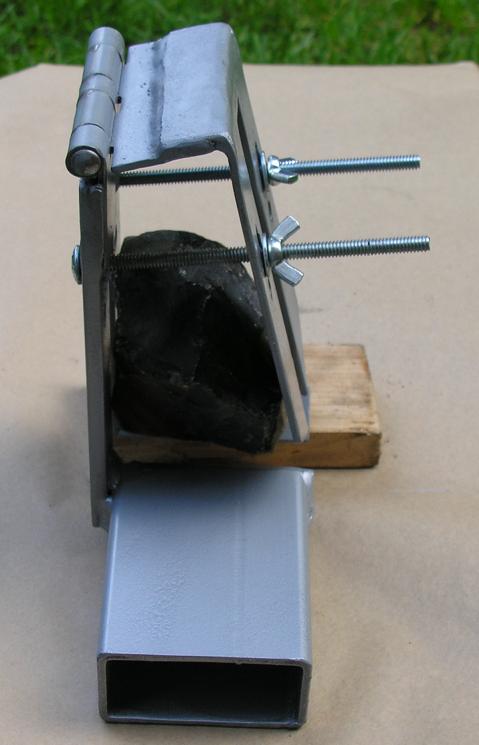
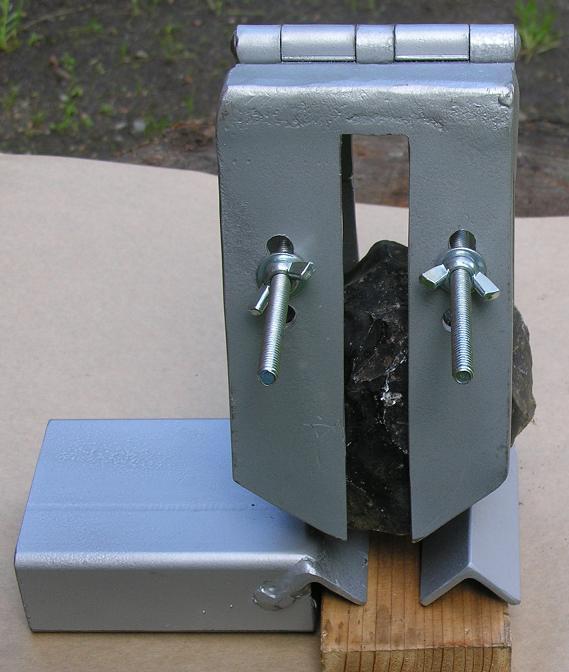
This rock clamp requires very little in the way of tools and material, the only critical tool is a welder. Materials:*, ** *Length of these parts are dependent on the type of saw, size of blade and whether the saw's carriage has a stop mechanism - see examples at the bottom of this article. ** all of the material I used was scrap obtained from a local steel supplier - all the pieces are small enough that they can usually be found in their scrap bin at a substantial cost saving. 1. (quantity = 1) 3-1/2" or 4" steel (weldable) hinge 2. (quantity = 1) 4" length of 1" x 4" rectangular mild steel tubing 3. (quantity = 2) 1-1/4" x 7-3/4"* x 1/8" mild steel flat bar 4. (quantity = 2) 1-1/4" x 7"* x 1/8" mild steel flat bar - one end of each piece cut at 45° angle 5. (quantity = 2) 1" x 1" x 4" x 1/8" mild steele angle iron 6. (quantity = 2) 1/4" x 6" carriage bolt w/washer/wing nut Tools: 1. 4" grinder with metal cutting wheel (metal cutting bandsaw or similar tool) and 80 grit flap wheel 2. Drill w/1/4" drill bit 3. Welder 4. Speed square, marking pen Asembly: 1. First mark and cut a 1" deep slot at a 45° angle in the top and bottom of the 1" x 4" x 4" rectangular base. These slots will fit on the angle iron post. 2. Next cut (2) 4" lengths of 1" angle 2. Cut (4) 7¾" lengths of 1/8" x 1¼" flat bar for top and bottom 'fingers' 3. Cut the ends of two of these bars/fingers at a 45° angle . Put a 90° bend in the last ¾" opposite the angle cut. 4. Drill holes in both top and bottom fingers so that the holes line up after the fingers are attached to the hinge. The holes in the top fingers should be elongated and start just past the hinge. The holes in the bottom fingers should be slightly oversized. These holes will allow the carriage bolts to move as the fingers raise and lower. 5. The last thing to do is to lay out and weld the pieces together. a. Weld the bottom fingers to the bottom of the hinge with the outside of the finger aligned with the outside of the hinge. BE SURE that fingers are aligned square to the hinge! b. Weld the top fingers to the top of the opposite side of the hinge. Be sure the points are inboard (see below)BE SURE that fingers are aligned square to the hinge! c. Weld the angles perpendicular onto the end of the bottom finger. The angles should be centered on the fingers. d. Weld the base (1" x 4" x 4" rectangular tube) to the left angle. BE SURE that the base is square with the fingers! 6. Ease all edges with the grinder and 80 grit flap wheel to remove any sharp edges. 7. Clean, prime, paint and add carriage bolts. This type of clamp is particularly effective for holding round rocks. It has six points of contact with the rock, three on either side, The top 'fingers' of the clamp hold the rock against the bottom fingers while simultaneously pressing the rock against the uprights. The top 'fingers' are made of steel apProximately 1/8" so that when the clamp wing nuts are tightened they bend slightly ensuring a constant tension. The short piece of rectangular steel tubing is held in the saw's vice. Depending on the type of saw, the clamp can be place in the saw vice vertically or horizontally. If the saw is a 'table saw' type (Lortone, Highland Park, Covington), then it can be mounted vertically and the height of the slot must he high enough so the the hinge will pass over the blade. These saw typically have some type of carriage stop which will also allow the clamp to be mounted in the vice horizontally. Other types of saws such as my Nelson Machine Works 18" require the use of a carriage stop to prevent cutting the clamp in two. Horizontal Position - Side View (requires a carriage stop) Horizontal Mount - Front View Vertical Mount - Side View Horizontal Mount - Front View |
|
©2010 J Keffer |