|
Instructions for Making a Slide Hammer
by James C. Keffer
I started making slide hammers after I was loaned one while digging some 'Black Butter' obsidian with Jim Smith. The owner of the slide hammer was Mike Kyle, a flintknapper from Iona, WA who passed in July of 2010. This 'How-To' articles is dedicated to Mike.
A slide hammer is a particularly useful tool for rock hounds and flintknappers. It is used to create or widen crevasses or seams in rock, loosen particularly hard soil/clay and generally free up rock that one wishes to get out. This slide hammer design allows for one-handed operation and virtually eliminates the risk of injury associated with most hammer/chisel work!
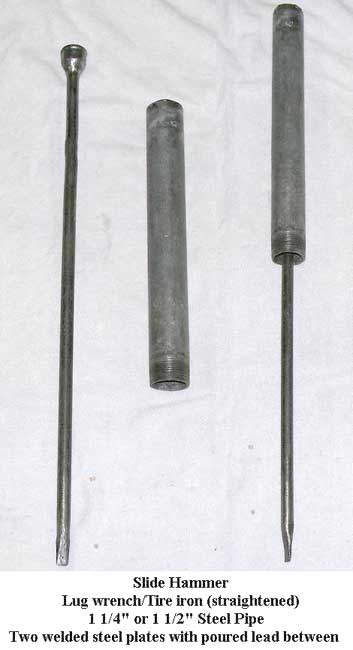
The slide hammer consist of two parts - the hammer, a length of pipe with one end weighted and securely plugged, and a chisel, an 18"-24" length of high carbon steel with a chisel point on one end and an enlarged butt end.
Materials:
1. An old style tire iron/lug wrench. They are found these days at garage sales and junk yards/auto wreckers/salvage yards. These make outstanding chisels for the slide hammer as they're made from high carbon steel and have great tensile strength. (How many times have you seen someone jumping on a tire iron to loosen a lug nut?)
2. Galvanized or black steel pipe. 1-1/4" or 1-1/2" in diameter, 14"-16" long
3. Two 1-1/4" or 1-1/2" diameter round steel disks, 1/4" or 3/8" thick
4. One 1-1/4 or 1-1/2 steel washer - the diameter of the hole should be slightly larger than the diameter of the tire iron.
5. Lug nut or two nuts the same size as the socket at the end of the tire iron
6. A section of threaded rod or bolt that fits into the lug nut or two nuts.
7. Lead - at least 16 ounces
Tools:
1. Welder (MIG welder is easiest but it could probably be accomplished with either a stick/Arc welder of even an Oxy/Acetylene welder)
2. 4" grinder with metal cutoff wheels and grinding wheels or 1-1/4"/1-1/2" metal cutting hole saws and drill.
3. Heat source and container for melting lead.
4. Torch or forge and anvil for heating and straightening tire iron.
5. Large vice.
Procedures:
1. First heat and straighten the tire iron. I use an Oxy/Acetylene torch to heat the tire iron and straighten first in a vice. Then I hammer it as straight as possible on an anvil.
2. Next cut the pipe (hammer to a length of 14"-16". To determine the best length, measure the straightened tire iron and make the pipe/hammer 3"-5" shorter. This will make the protruding end of the chisel extent past the end of the hammer 6"- 8" when completed.
3. Cut two round steel disk from steel plate. The thickness of the disk needs to be at least 1/4". Anything beyond 3/8" thick is overkill. I use a piece of the hammer pipe as a guide for marking the diameter of the disk. Simply lay a small section of the pipe on the sheet steel you'll be cutting and draw and line around the inside of the pipe. Cut the disk out using a cutoff wheel on a 4" grinder by cutting along the outside of the mark. Alternatively use a hole saw of the appropriate size. You want the disk to fit snugly inside the hammer portion of pipe.
4. If using galvanized steel pipe you need to remove the galvanized coating from the inside of the first three inches of one end of the pipe. This is to allow the disks to be welded to the inside of the pipe. The galvanized coating, zinc, produces toxic vapors when heated and is difficult to weld through.
5. Place the steel disk in the end of the pipe that has had the galvanized coating removed. Place it 3" below the end of the pipe and make sure it is square with the sides of the pipe.
6. Weld the disk to the inside of the pipe. This is the most critical part of the process so be sure your welds are good and strong. Even though the disk can be adequately welded in a single pass I make two passes just to be sure. In addition to attaching the disk to the inside of the pipe, a heavy weld bead acts as a brace for the disk.
7. Melt enough lead to fill up the end of the pipe above the steel disk and pour in enough lead to fill the three inches within about 1/8" of the top.
8. Let COOL. It is very important to let the lead cool.
9. Once the lead has cooled (cool enough to handle), take the second disk and place it on top of the lead. The tighter the fit the easier it will be to weld.
10. Start welding the cap disk with small 'tack' welds and let cool after four or five 'tack' welds. This cooling helps prevent the lead from melting and boiling out. Lead melts at 600 degrees F and the heat from the arc of a MIG welder is more than ten times that hot! Continuous MIG welding with cause the lead to melt, then boil, then spatter and finally vaporize. The spatter and vapor both can be harmful or even deadly!
11. Finish welding completely around the cap disk with small tack welds allowing the piece to cool after every 5-6 welds. Once the cap is welded all the way around and completely sealed, you can go back over the cap with a heavier, continuous weld bead.
12. Next we want to build up the socket end or 'butt' of the chisel. The idea is to fill the socket with steel to prevent the socket from expanding when struck by the hammer. I either use a lug nut or two nuts the size of the socket, threaded to a bolt/threaded rod. I place the nuts/bolt in the socket and using a cutoff wheel, cut off flush with the top of the socket. Make sure that before cutting or welding that the nuts/bolt combination is seated fully and firmly in the socket.
13. Using a welding setting capable of welding 1/4 single pass, I weld the nuts/bolt combination to the socket forming a solid end.
14. Grind the weld smooth and flat. This provides the best platform for the hammer.
15. Once the welds are cool, stand the hammer pipe upright in a vise with the plugged end down.
16. Place the chisel, socket end first, into the hammer pipe. Slide the appropriate sized washer over the chisel and down onto the end of the pipe. This washer will, when welded to the pipe, prevent the chisel from coming out.
17. Weld the washer to the end of the pipe.
18. Smooth out all of the welds with the grinder (flap wheels work best) and you're done!
|