Flint Knapping: Pressure Flaking
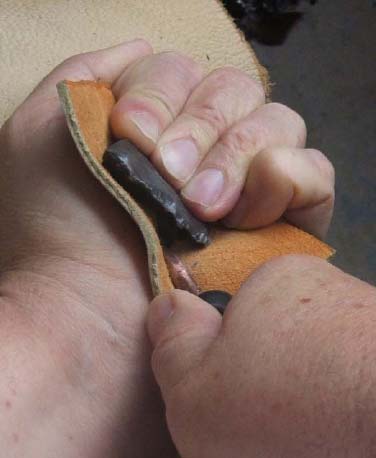
Photo courtesy of F. Scott Crawford
Compiled/Edited by Michael Lynn
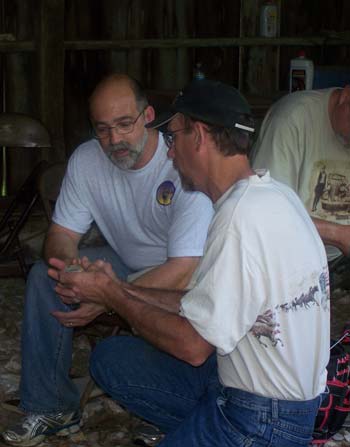
Photo of Tim Dillard teaching me at the Center for American Archaeology in Kampsville, IL
Dedicated to all those who have taught someone else about the art of flint knapping, especially to my primary teachers – Bruce Boda, Tim Dillard, Mike McGrath and Steve Nissly. This is my attempt to pay forward.
© Michael Lynn, 2010
Although the copyrights to the individual articles and tutorials in this e-book belong to the authors, I have copyrighted this collection. It may be freely printed, copied, posted on the internet and otherwise distributed as long as said distribution is free and appropriate credit is given to me and the authors. This e-book may not be sold for profit.
Flint Knapping: Pressure Flaking
Small Point Pressure Flaking
3
by F. Scott Crawford at www.arrowhead-makeyourown.com
From Beer Bottle to Arrowhead
4
by Tim Rast at www.cavemanchemistry.com
How to Make Your Own Arrowhead 10
by F. Scott Crawford at www.arrowhead-maker.com
Using Your Legs When Pressure Flaking 16
by F. Scott Crawford at www.arrowhead-makeyourown.com
Why Pressure Flakes Fall Short 18
by Mark Bracken at www.flintknapping tools.com
Slab Knapping Tutorial 19
by Mike Tylzynski (aka Idaho Clovisman) at www.paleoplanet.net
Pressure Flaking a Big Blade from a Slab 33
by Jim Winn (aka Paleoknapperjim) at www.paleoplanet.net
Flake Over Grind (FOG) 101 46
by Tom Dodge (aka peblpmp) at www.paleoplanet.net
Parallel Flaking Techniques 53
by Jim Winn (aka Paleoknapperjim) at www.flintknappers.com
Micro Flint-Knapping 56
by Craig Libuse at www.craftsmanshipmuseum.com
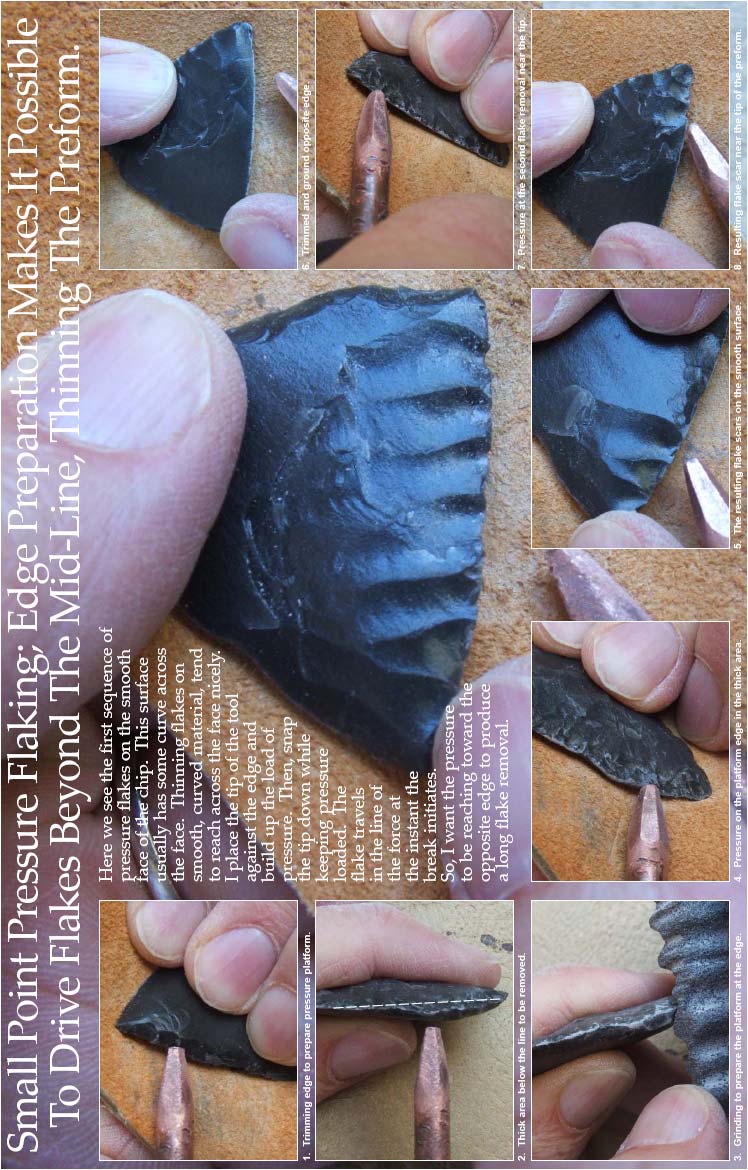
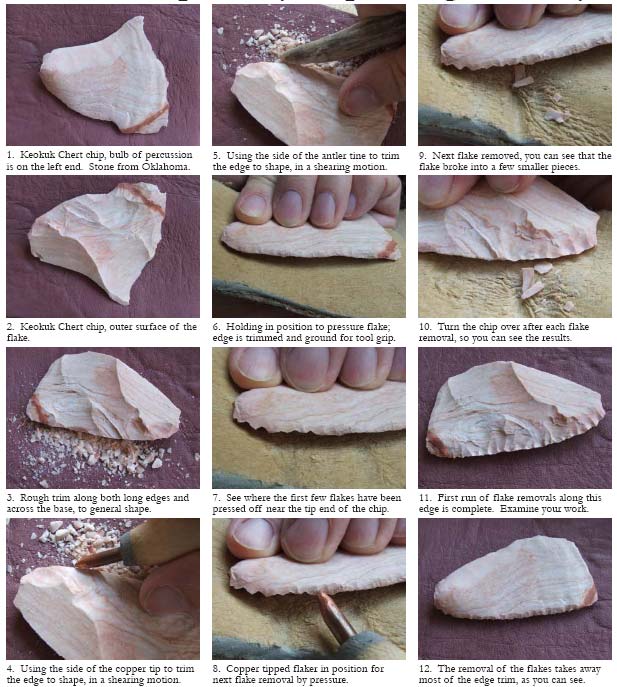
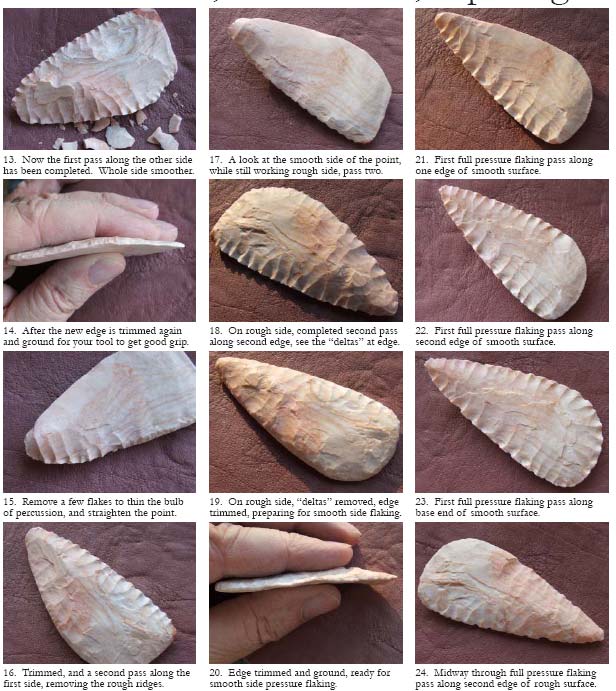
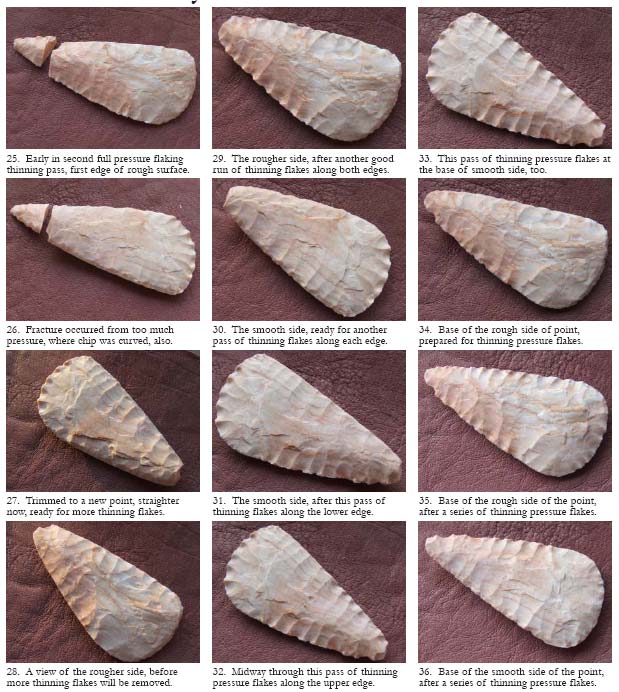
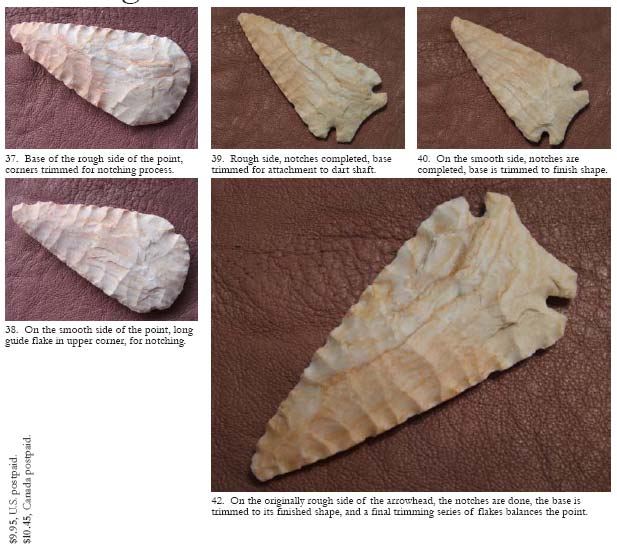
Small Point Pressure Flaking
F Scott Crawford © 2009 All rights reserved
From http://www.arrowhead-makeyourown.com/, April 6, 2010, copied with permission from “How to Make Your Own Arrowheads”
From Beer Bottle to Arrowhead
By Tim Rast
This page describes how to knap an arrowhead out of a beer bottle bottom. This includes breaking a bottle and working with extremely sharp broken glass. YOU CAN BE CUT AND SERIOUSLY INJURED. GOGGLES MUST BE WORN AT ALL TIMES. Kids, ASK YOUR PARENTS TO READ THIS PAGE BEFORE YOU TRY MAKING AN ARROWHEAD.
Ingredients (required):
recommended:
1 Beer Bottle (empty)
1 Hammerstone 1 hammer
1 Pressure Flaker 1 tarp
1 Notching tool 1 file (for sharpening the pressure flaker)
1 Leather Palm Pad (or heavy denim substitute) 1 abrading stone
1 Pair Goggles 1 dustpan
1 Pair Heavy Leather Gloves 1 broom
1 LARGE box band-aids
Step 1: Selecting the Bottle
Don't overlook the importance of this first step, finding a good bottle to start with will determine how successful your knapping attempt will be. The best part of the bottle to use is the bottom, because the glass tends to be thicker than the sides of the bottle, and much less curved. So when picking your bottle, pay special attention to the bottom.
- Colored glass is better than clear glass. Its very difficult to see what you are working on when you work clear glass. Amber or green glass bottles work well
- Flat bottoms are crucial. Wine bottles with big kick-ups are not good for knapping. Most bottles have some curvature to the bottom - its best to avoid noticeable concave bottomed bottles in favour of flatter bottoms. (This may entail switching brands of beer - so the decision is not always an easy one)
- Avoid bottoms with elaborate embossed markings, like makers marks, numbers, or other designs. These lumps and bumps can be tricky to get rid of.
- Begin with a smaller beer bottle before you try a larger flat bottomed wine bottle. They are less difficult to hold and its easier to cover a smaller surface with flakes than a larger one. You can work up to wine bottles.
Step 2: Breaking the Bottle
Now you are going to need to break the beer bottle. You want to break it in such a way that the bottom will not be broken. Throwing it against a wall or rock is NOT a good way to start as the bottom is likely to break. Try wrapping it up in a corner of your tarp or a very heavy plastic bag and hitting the shoulder of the bottle with the hammer. NOTE: Wrapping the bottle up like this contains the mess, it does NOT protect you from the broken glass - The breaking glass can cut through the tarp and plastic bag quite easily. WEAR HEAVY LEATHER GLOVES.
Its easier to break a bottle by hitting it in the middle, but you have a greater chance of breaking the bottom if you hit it there, so strike the shoulder. If you don't have a hammer, try a hammer stone. Be very careful.
Alternatively, it is possible to cleanly pop the bottom off of a bottle by putting a nail into it (tip down) and shaking it straight up and down with your thumb over the mouth of the bottle. A bigger nail is necessary for wine bottles. I use a round file as a substitute. If successful, the bottom of the bottle will pop out as a sharp glass disc.
Step 3: Cleaning the Hanging Glass off the Bottom
Unwrap your broken bottle. Hopefully the bottom will be in one piece. If it is, it will likely still be attached to sharp glass from the sides of the bottle. You will need to trim these hanging shards off, so that you have a nice flat bottom to work with. Hold the bottom upside down so that the shards hang down. HOLD THE BOTTOM WITH LEATHER GLOVES OR WITH YOUR LEATHER PALM PAD. Brush the hanging glass off with your hammerstone or the hammer. If you have a stubborn shard, try changing the angle you are holding the piece before you try striking harder. Don't brush too much, you just want the bottom to be flat - too much brushing will make nasty step fractures. Step fractures are failed flakes which break and end with straight edges, rather than gently feathering out. When you are done, look at the bottom and you will see "dents" on the inside of the bottle where you broke the hanging shards off. These dents are flake scars.
Step 4: The Serpentine Edge - Alternate Flaking

edge, 2) cover both faces with flakes, 3) shape it, and 4) notch it (optional). Points 2 & 3 will be discussed in the next section, and you don't have to worry about notching yet. We are going to start by making a bifacial edge all the way around the bottle bottom. A bifacial edge is an edge which has been worked on both (bi-) sides or faces. Look at your bottle bottom. If you followed the instructions in step 3, you will only have flakes scars from removed hanging shards on the inside of the bottle bottom, and none on the outside. Pieces
worked only on one side are called unifacial.
Ok, lay the bottle bottom flat in the leather pad in the palm of your left hand (if you are right handed), and clamp your fingers down on top, to firmly hold the glass. It doesn't matter which side is up or down, just make sure that the edge you want to start working is exposed. You should have a little sandwich in your hand which goes; fingers, leather, glass, leather, palm. Now rest the back of that hand against the inside of your left knee for support. Using
of the glass. Don't pry the flake off, push it off. You really have to push hard to get a flake to come off. If detaching the flake hurts or bruises your palm, double or triple up your leather palm pad.


The flake removed will look something like a little half cone, and the flake scar will be a negative cone. You can fit the flake back into the scar to see what I mean by a positive cone (flake) and negative cone (flake scar). Ok, put your flake somewhere that people won't step on it and get back to your bottle bottom.
Flip the glass over so that the flake scar that was on the bottom is now on the top. You will use that flake scar as the platform for your next flake. The platform is the place where you place the tip of the flaker to push a flake off. You want to place the tip of the flaker to the left or right of the center of the flake scar, so that the next flake you remove will be off to one side of this first flake. Again, push down with the flaker and take another flake off. What you should have now is a bottle bottom, with two flake scars: one on each face. Now flip the glass over again and use the flake scar left from the second flake removal to remove a third flake. Continue to alternate flake around the entire edge of the bottle. When you are done you will have a wavy, bifacial serpentine edge!
Step 5: Shaping
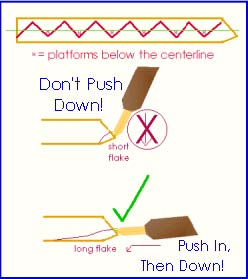
Now you have a wickedly sharp, bifacially worked bottle bottom. It doesn't look anything like an arrowhead yet - why? Its not shaped like one, either in cross-section or outline. The flake scars are only around the edge, they don't cover the face of the glass yet. You need to pressure flake it into shape. To do this, you need to change strategies a little. Instead of taking short chunky flakes off, like you did to make the serpentine edge, you need to take long, flat flakes off, which cover the faces of the bottle bottom, not just the edges. To do
this, you change the angle you are flaking. Instead of pushing down, you want to push into
the glass.
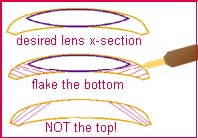
Shaping - Cross-section
If you look at your beer bottle bottom from the side, you will see that it is now, more or less, hexagonal. It has two flat faces and steep bevelled edges. It will also have a slight curvature to it, with a concavity on the bottom face and a slightly convex top surface. Arrowheads are, most often, lens shaped in cross-section. To achieve this lens shape, you need to get rid of all the concave curvature of the glass. In the process you will also be covering the blank faces with attractive flake scars. Most of the work you need to do is on the bottom, concave side of the glass. It will be very tempting to remove flakes from the upper, convex side because flakes love to travel across convex surfaces. The flakes you remove from the bottom will be very short by comparison, but that's okay. They will get longer as you work at removing the curvature of the glass. Taking beautiful long flakes off of the upper, convex side of the glass will only make the curvature worse.
To remove the cross-section shaping flakes you will need to use the serpentine edge you've created. Creating the serpentine edge has made a whole series of platforms. The wavy edge zigzags up and down across the centerline of the edge. This is important. Your edge has peaks which are above the centerline and valleys which are below the centerline. (Check Wyatt Knapp's discussion of the "Below the Centerline Concept" for more detail) Your edge looks something like this: /\/\/\/\/\/\/\ You use the valleys as platforms to take off flakes. Look at you glass and find the peaks and valleys. The valleys are the platforms. Imagine the
centerline. Now flip it over. Find the peaks and valleys. Find the platforms.
Hold the bottom in your hand, the same as when you made the bifacial serpentine edge. Make sure that the concave face is on the bottom. Find the peaks and valleys. Place the flaker tip against one of the valleys. Instead of pushing down, push into the glass. Push hard, build up a force and then push down a little to detach the flake. Remember push in, then down. Don't flip the glass over. Instead, move to the next valley and remove your next flake. Go all the way around. Then do it again. Don't be discouraged if your flakes aren't very long. You may have to go around the glass 3 or 4 or 5 times before the flakes reach all the way to the center. Everyone's flakes are short the first time around.
As you knap, your edge will get higher and your platforms (the valleys) will become less pronounced. So you will have to make new ones. You can do this a couple of different ways. One way is to use the tip of your flaker to brush up on the edge. This will remove tiny flakes from the upper surface of the edge (WEAR GOGGLES!). This will get rid of the thin brittle edge, making it stronger and lower. The second way to make new platforms is to grind the edge with an abrading stone. I just use one of my hammerstones. Again, you want to prepare your platforms in the opposite direction that you are flaking. Flip the glass over, so that the face you want to flake is facing up and brush the edge, in a downward motion, with your abrader stone. Flip the glass back over, look for the platforms below the centerline, and keep knapping.
Keep this up until you achieve the desired lens shape. Remember to spend most of your time removing flakes from the concave side. It won't take you very long to cover the convex side with flake scars.
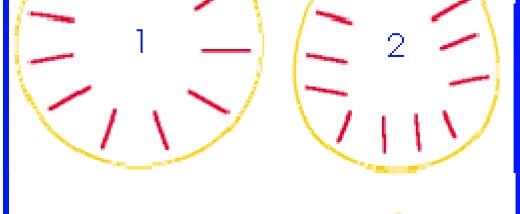
 Shaping - Outline
While you are working on the lens shaped cross-section, you will also want to coax your bottle bottom into an arrowhead shape. There are no hard and fast rules for shaping the outline of your arrowhead. If the bottle bottom is circular you can arbitrarily select a pointy end and a base end. Gradually change your circular bottle  bottom into a triangle. If your glass is not perfectly round, look for the longest axis, and align your triangle along that. The first step is to stop thinking about the bottle as a circle and start thinking of it as a chubby triangle. Instead of working around and around in a spiral, work from three directions - in from the two sides of your arrowhead and up from the base. When you abrade your platforms, keep the triangle in mind and work towards that goal.

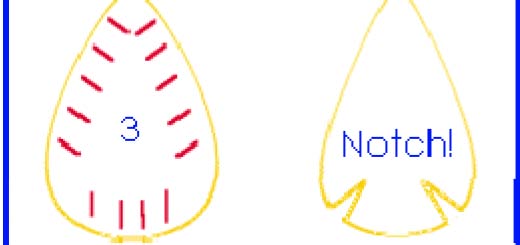
Step 6: Notching
Wow! You made it - you have a lens-shaped triangular arrowhead. All you have left to do is notch it! The notching tools I typically use are sections of coat hanger mounted in broom handles, which have been filed to a chisel shape or copper wire which has been hammered flat (see the Pressure Flaker Page). Pick the point on the edge of the arrowhead where you want to start your notch. Use your notching tool to create a little nick in the edge, the same way you made your first flake on your serpentine edge. Flip it over. Take another flake of in the same place you took the first little flake off. Flip it over and keep doing it. Its the same sort of process as you used to make the serpentine edge, except you are flaking straight into the body of the piece instead of around the edge. Repeat the process for your second notch.
Tip: I like to make both notches at the same time, rather than finishing one and starting on the second one. I find that they turn out more uniform if I work on them together.
From: http://www.cavemanchemistry.com/oldcave/projects/stone/bottle.html, April 2, 2010, copied with permission
How to Make Your Own Arrowhead
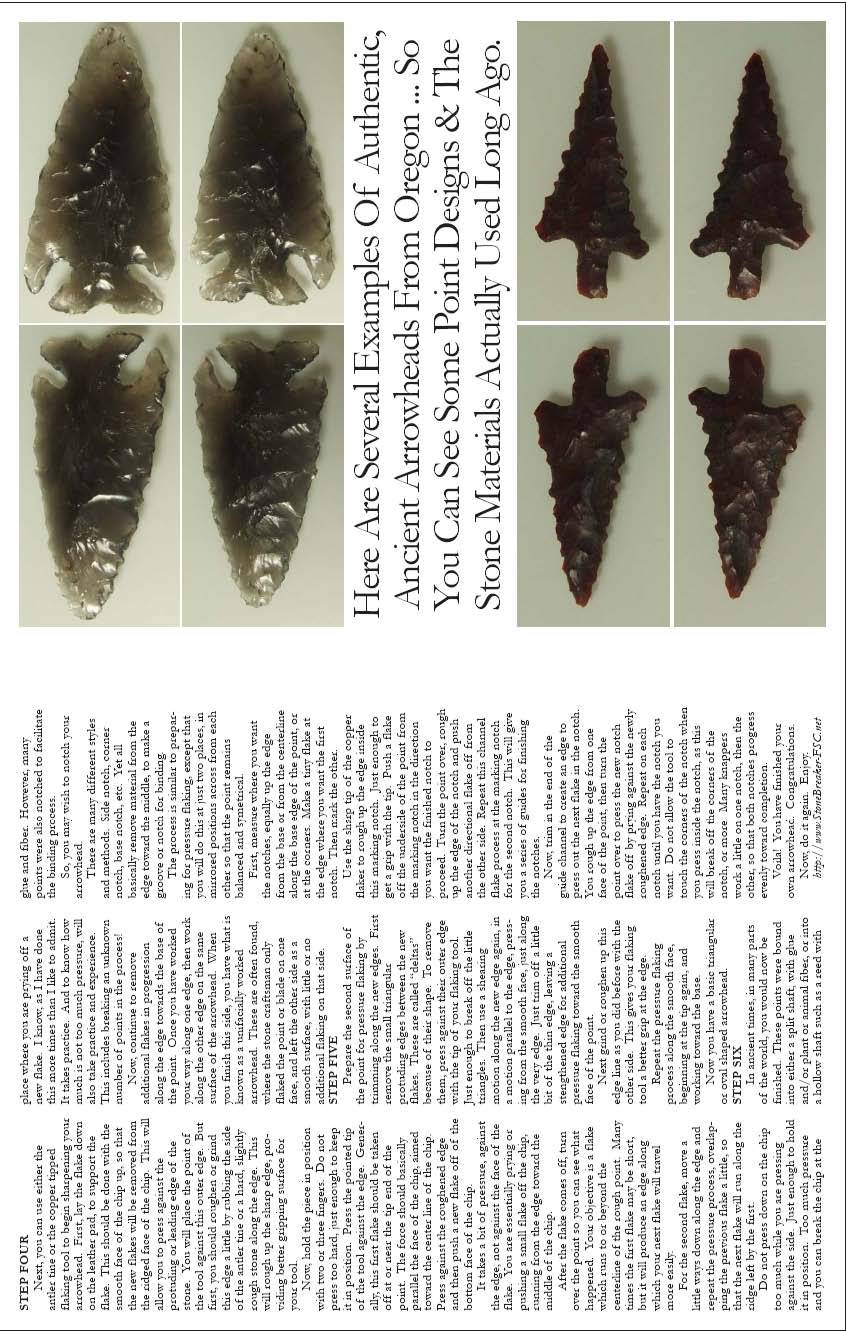
From http://www.arrowhead-maker.com/, April 6, 2010, copied with permission
Using Your Legs When Pressure Flaking
F Scott Crawford © 2009 All rights reserved

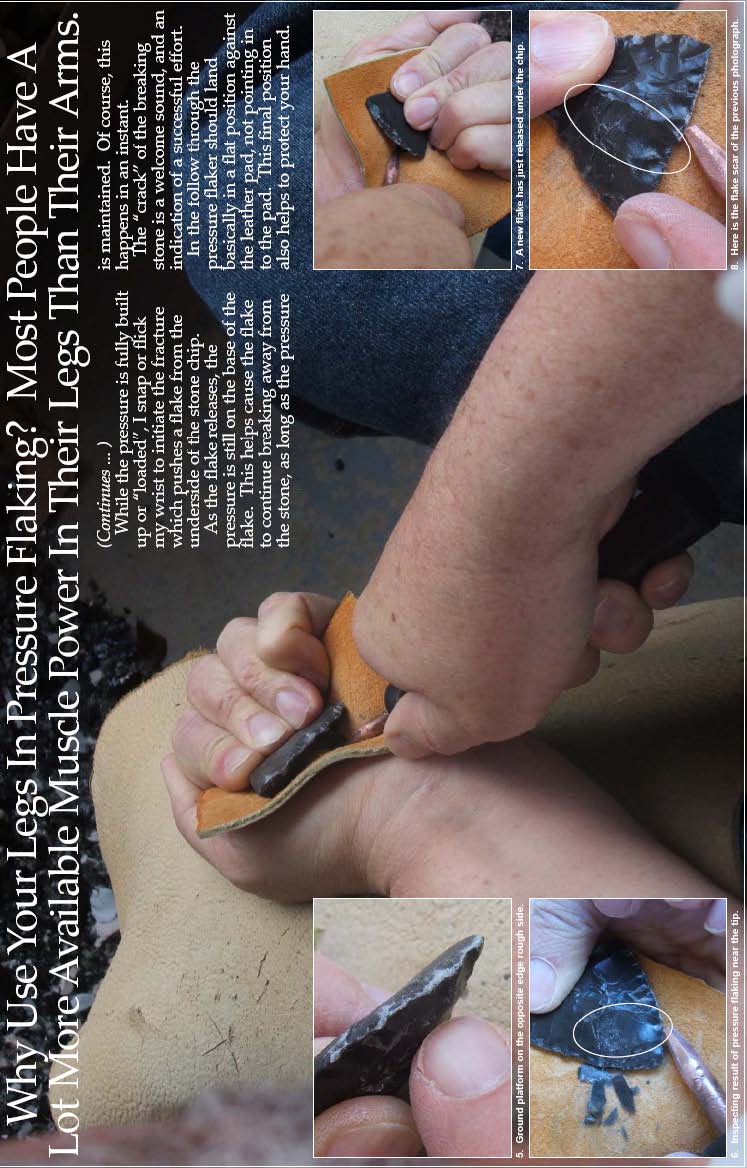
From http://www.arrowhead-makeyourown.com/, April 6, 2010, copied with permission from “How to Make Your Own Arrowheads”
Why Pressure Flakes Fall Short
by Mark Bracken
There are several things to consider when your flakes fall short of your targer or don't run as far as you want. All these tips below are complimentary to each other. They all pieces to the puzzle, they are all importaint.
- The first is your flake path. What I mean is that you have to choose proper places on the biface that lend themselves to longer flakes. These gennerally are the highest places on the surface of the bi-face or preform. You must be sure that your choosing ridges and or humps to "guide" the flakes down.
- The second thing is that you have to grind or buff up the edge with your abrading stone just enough to support the pressure your applying to the edge. Too much and it will take excessive force to generate a flake leaving you with a broken preform or a sprained wrist. If you do not grind enough, the edge can crush or create a small chip.
- The third is that there is quite a bit of "body English" or follow through with the pressure flaker's or Ishi stick's use. What I mean is that when you peel a potato with a peeler, you follow the contour of the potato. This is because you want to create a shaving that is all one piece. THis saves time and effort. So, with using the pressure flaker it is no different. You must guide the flaker in the same way. Place the flaker on the edge and slowly build up pressure, then as the flake begins to detach, with a "peeling" action guide the tool tip with a following through action.
- The fourth thing is that flakes will travel farther if they are pushed in a oblique manner. (remember this critical rule...do not chip flakes down a surface that is concaved. It must have some amount of convexity.) If you can... try not to push them strait into the piece. (or a 90 degree angle from the edge) Fakes will rarely cross the center line on the piece.
- The fifth thing is to work in a row. Like shelling corn of a corn cob. Start at the base or tip (depending on the way your holding it) and chip the flakes off in a row. Each flake following the other's scar. Sometimes you will need to skip an area because there is not a good path for the flake to travel on. With each pass down the preform it will become more uniform with less and less high spots.
- Keep your flaker sharp! Your flaker tip can be a number of different types, paddle, flat, chisel, Pounded round to a point, or pounded round to a point with four square edges. The key thing here is that your contact area must be at a minimum. You can't do good pressure work with a dull flaker point. Remember to pound your copper tips NOT grind them. They will stay nice and hard. It's common for it to be necessary to re sharpen a flaker tip many times before the piece is finished.
From http://www.flintknappingtools.com/flaking_tips.html, March 31, 2010, copied with permission
Slab Knapping Tutorial
By Mike Tylzynski (aka Idaho Clovisman)
"ok i will go out and turn the edge on a slab and post a picture..give me a few min..hope this helps now once you tell me you got this part i will show you the same slab set up for a complete pass..
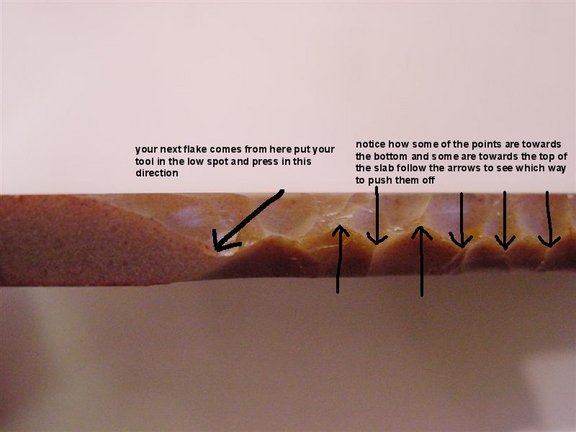
Figure 1
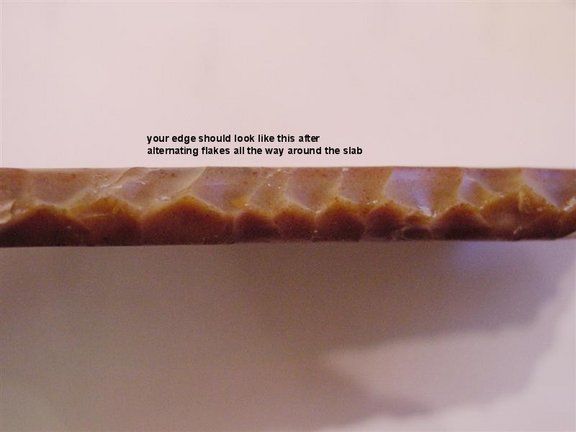
Figure 2 Figure 3 Figure 4 Figure 5 Figure 5a Figure 6 Figure 7 Figure 8 Figure 9 Figure 10 Figure 11 Figure 12
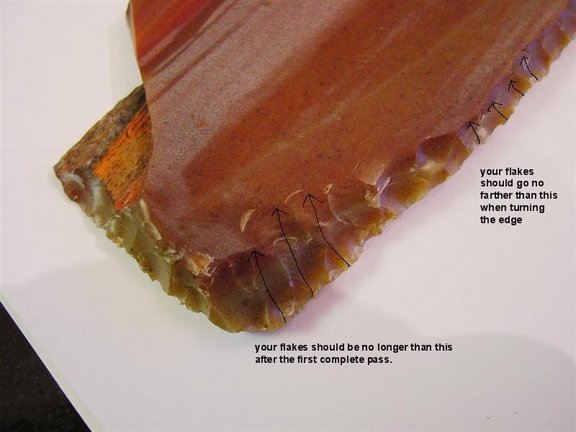
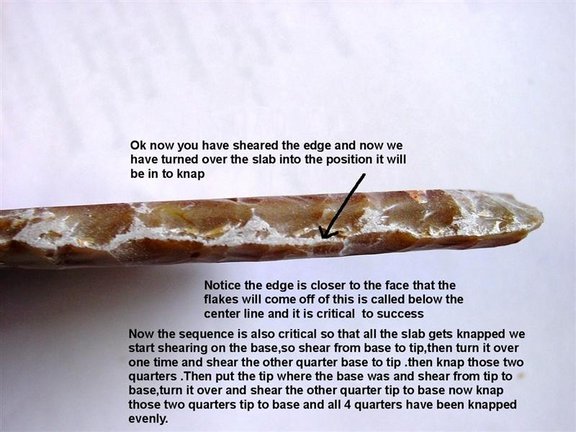
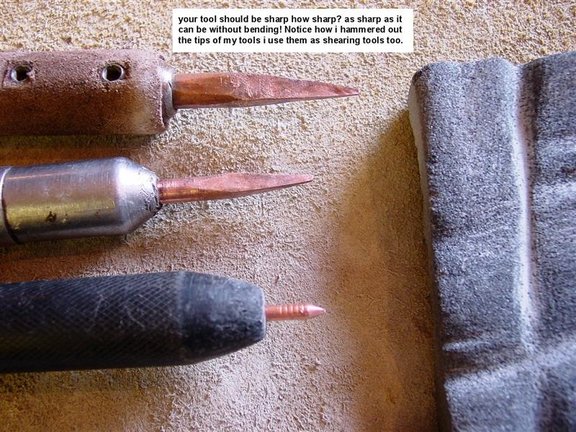
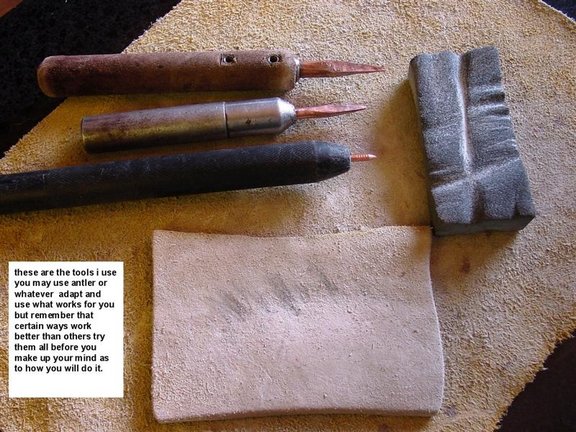
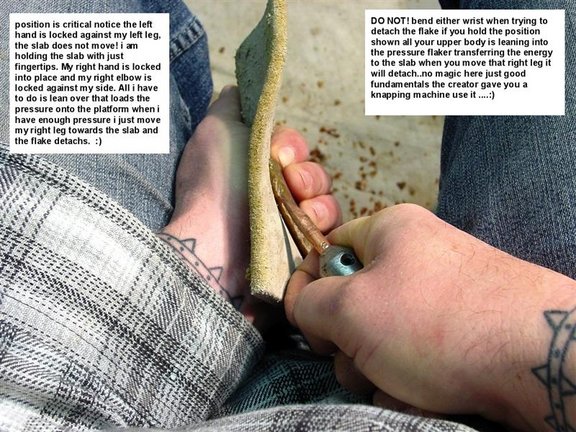
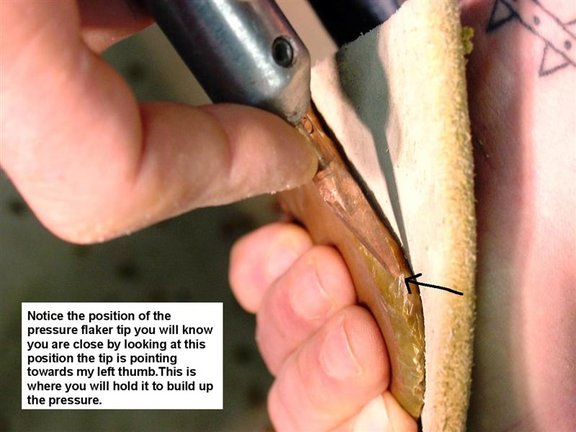
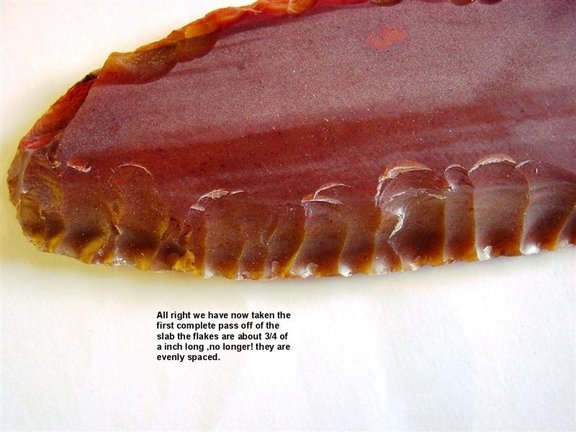


Figure 13"
From http://www.paleoplanet.net/, April 3, 2010, copied with permission
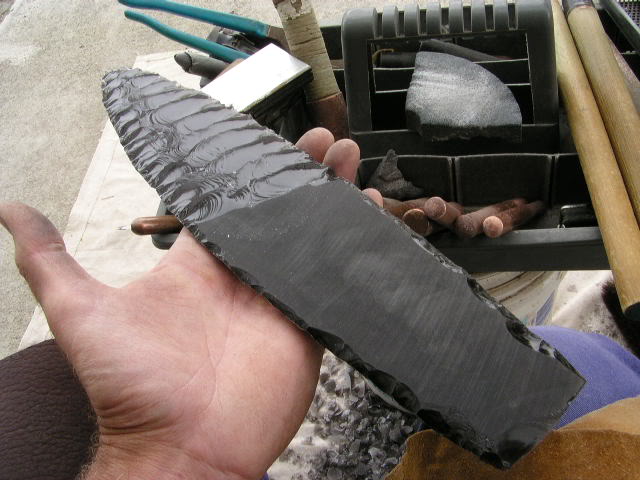
Pressure Flaking a Big Blade from a Slab
By Jim Winn (aka Paleoknapperjim)
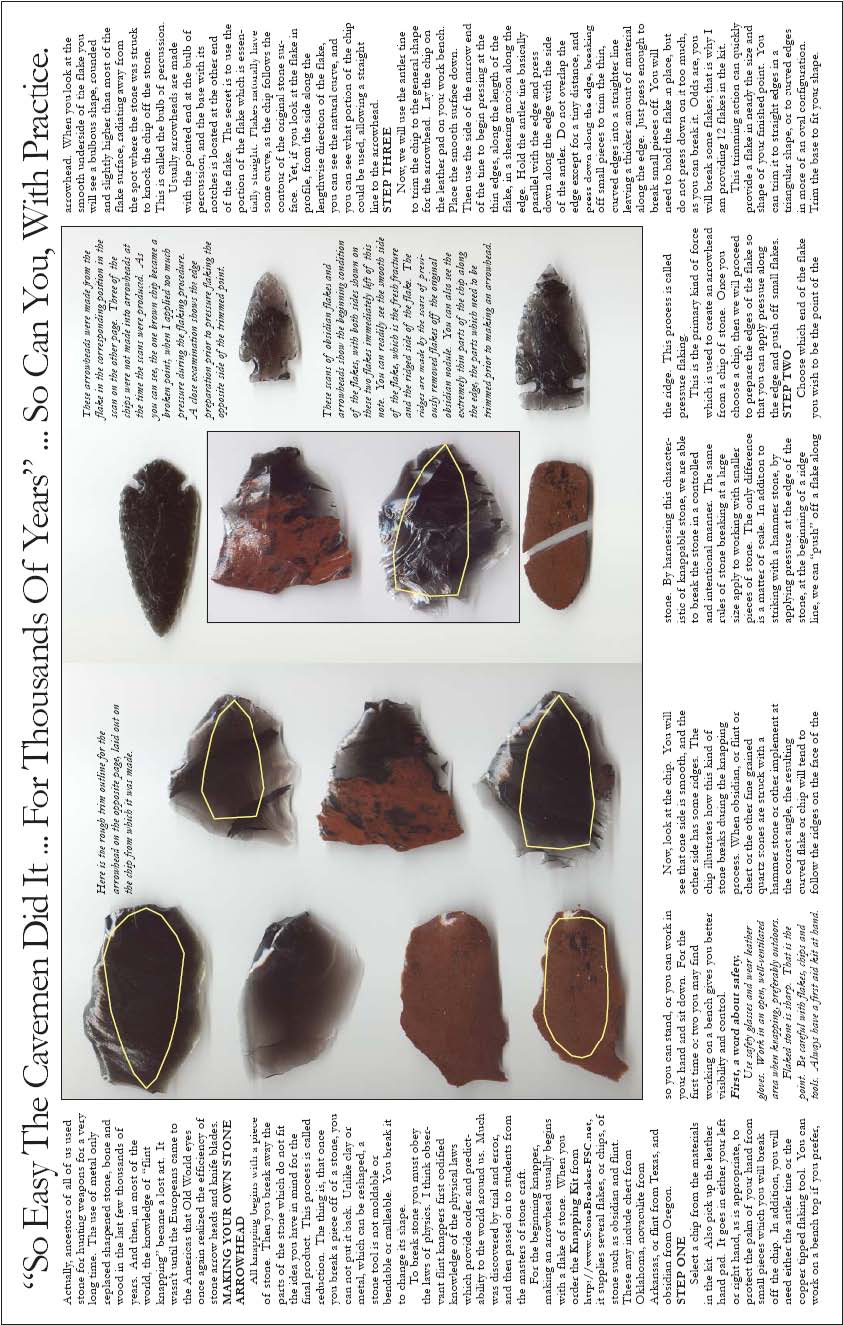
The following sequence of pics was taken while knapping a large blade from a slab. The idea is to try to show a successful technique and strategy that can produce a large wide blade using very light percussion and heavy pressure flaking. I did a similar tutorial several years ago, but since that time I have developed a better strategy that is capable of producing wider blades with better success. The following outlines the procedure:
This pic shows the slab before being worked. It measures 15 long and thick.
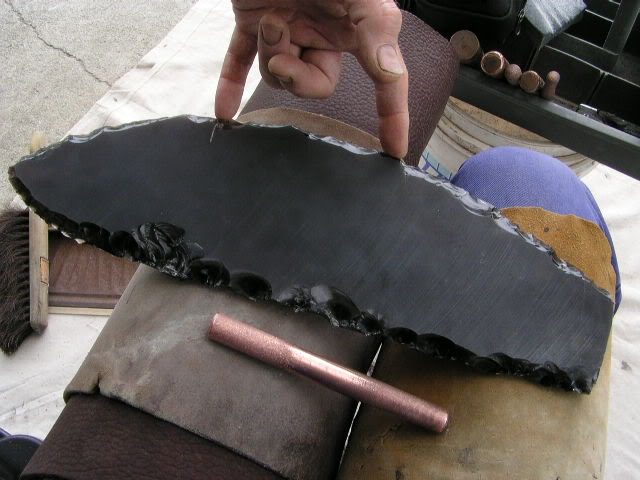
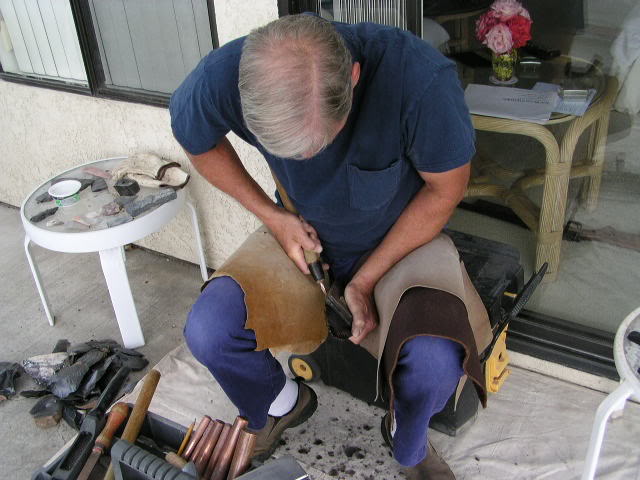
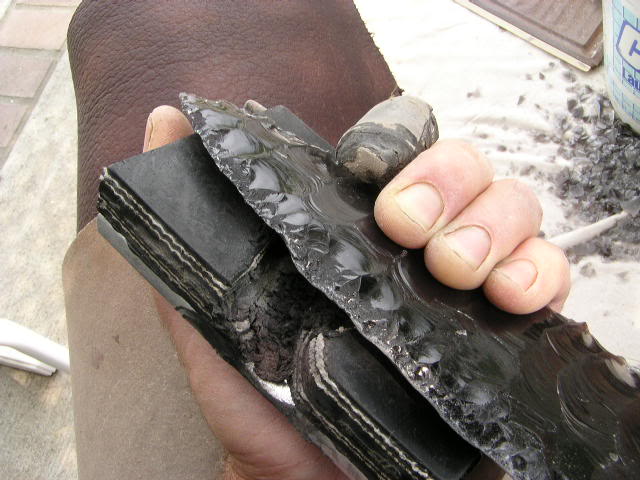
P2 I begin by removing the square edge by alternate beveling using a 5/8 thick solid copper billet. Each time a small flake is removed the slab is turned over and another small percussion flake is removed along the edge of the previous flake. This pic shows where I intend to strike to remove the next small flake. Note that the flake to be removed is resting directly and firmly on my leg to dampen the shock to the slab to reduce the chance of breakage. This can be done with pressure flaking also which is less risky but it is very time
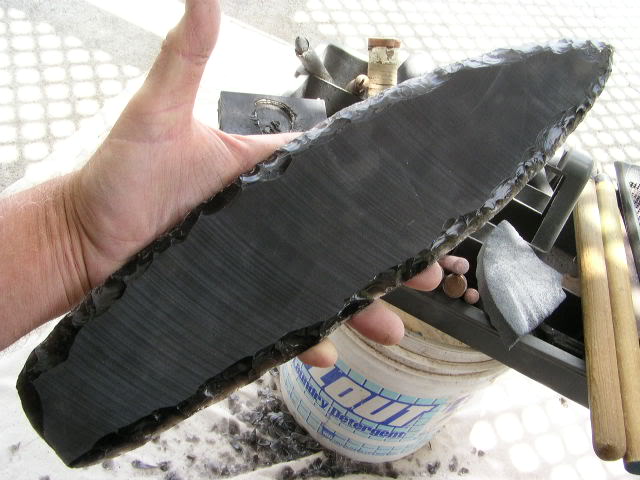
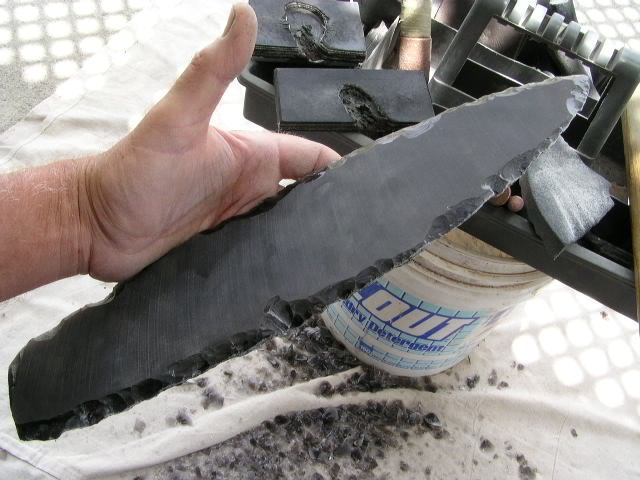
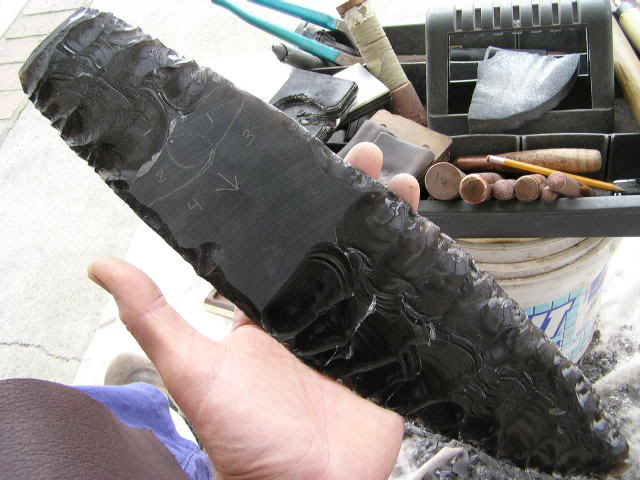
The square edge has now been removed from the slab. Its rough looking, but the idea here is to just get rid of the square edge so that platforms are created that allow further light percussion to shape the slab. My fingers are pointing to 2 cracks. That edge must be brought in using light percussion until the cracks are gone. Also, only very light percussion can be The slab now needs to be roughly shaped. Light percussion is used to get the desired shape and symmetry and one side must be chosen to be the first face to get pressure flaked. The goal is to have the edge about 1/8 below the face to be pressure flaked. This picture shows the back face which will be flaked last.
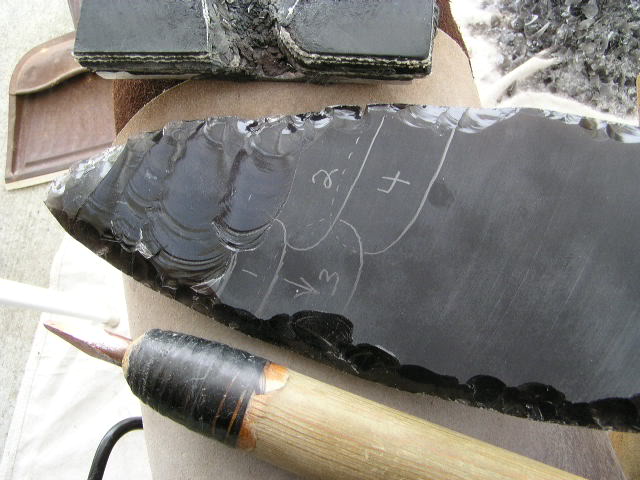
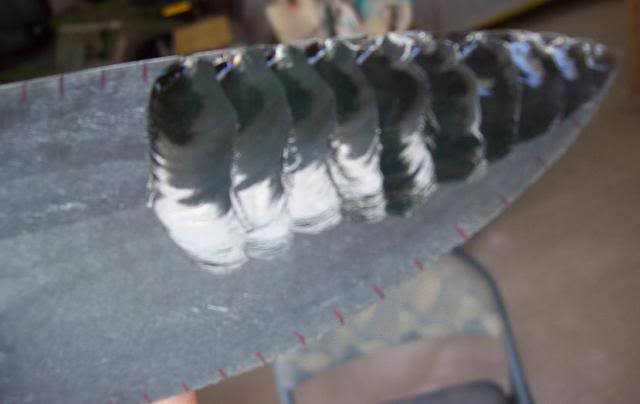
This picture shows the face that we will pressure flake first. Its not perfect, but its good enough! The edge is roughly 1/8 below the face and it has been ground heavily to provide a I started at the tip and began removing pressure flakes using an Ishi stick. The first 5 flakes do not have to travel far and go nearly to the opposite edge. Now it is time to begin to remove flakes from one edge, then the other. This picture shows the intended flake removal sequence for the next 4 flakes. By removing flakes from one side and then the next, continuous ridges running from edge to edge are created. This allows each flake to travel a bit further. If the flakes are removed down one entire side they will not run as far. Thats OK, but if you are trying to maximize the width of the biface it is better to alternated from one
This pic shows the next 4 pressure flakes after they have been removed.
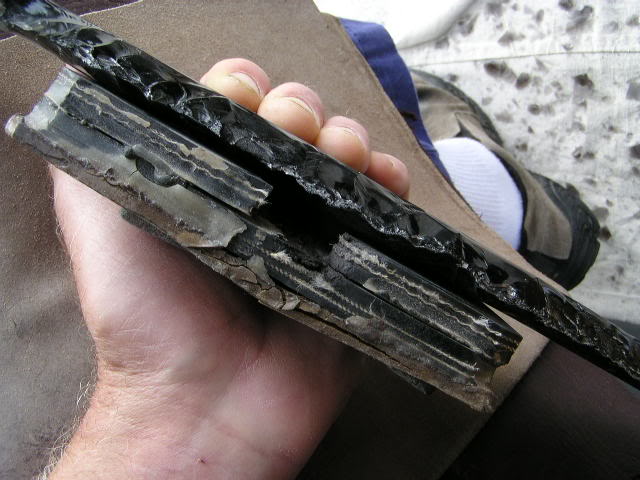
The blade is now flaked to about the midpoint lengthwise. Time to switch to the base and begin removing flakes from the base back toward the midpoint. The advantage of doing this is that it provides an additional opportunity of correcting any short flakes that may happen. For example, if I get a short flake when working from the base toward the mid section I will stop. I then switch back to the mid section and work toward the base and the problem area. It is a lot easier to correct a short flake when doing this. It gives you a second chance to correct P9 This pic shows how the Ishi stick is used. Note that the blade is held firmly on a notched rubber pad. My left hand is resting firmly against my left inner leg. My wrist is bent backward so that the Ishi stick force can be applied toward the opposite edge. In reality, the Ishi stick is actually pointing toward the opposite face, in other words, beyond the opposite edge. This is necessary in order to remove as large a flake as possible. Pressure is built up to about the maximum that I am physically able to apply, and then the left hand is rotated very slightly until the Ishi stick is pointing directly at the opposite edge. At that instant the flake will release. This all happens very quickly. It is impulsive. I have seen many knappers building up pressure slowly and straining till they are almost shaking hoping that the flake will release. It usually does not. So they change the angle of applied force till it is pointing toward the face they are flaking. This always results in a short flake. The flake will This pic shows how the blade is supported on the notched pad. Note that the area where the flake is to be removed MUST be directly over the notch in the pad. If the flake touches the pad at any point, that area will result in a small step fracture. The flakes are elliptical in shape, and the notch in the pad must be elliptical in shape also. Pads that are bought are generally straight sided. Dont buy em, make your own! You want an elliptical shaped notch that is sized just a bit larger than the flake to be removed. If it is too large, too much bending stress is created and the blade may break. If it is too small the flake will step at the point of
OK, this pic shows the continuation of the flaking process from base to the mid section. Notice the intended sequence of flake removal, from one edge to the other to provide nice The first face is now completely pressure flaked. All traces of the saw marks have been removed. However, this face is still fairly flat and lacks convexity. Therefore the plan is to remove another set of pressure flakes from this same face to provide additional convexity and
The edge is still close to the face just flaked. A small billet is used to drive off small percussion flakes toward this face and move the edge closer to the centerline. The goal is to create a platform very close to the centerline for the next set of pressure flakes, and then to This shows the blade after the 2nd set of pressure flakes has been removed from the same face .It is hard to see in the pic, but this face now has much better convexity. In addition, we
The blade is now flipped over and the small billet is used to bring the platform up to about 1/8 of this face using very light percussion flaking. The platform is abraded and pressure
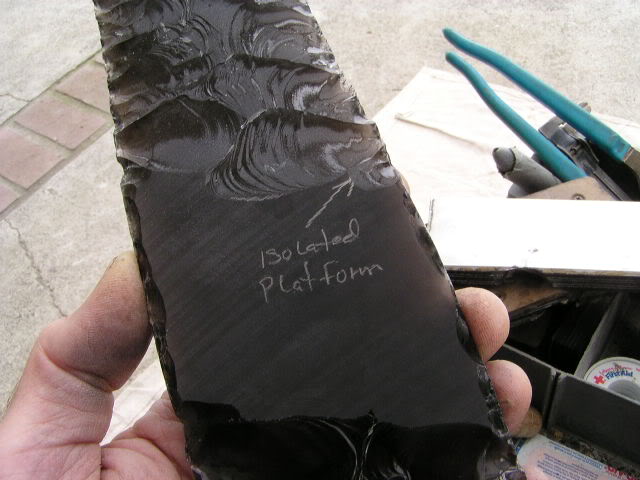
Flakes are now removed starting at the base and working toward the mid section, to meet up with the others. As we progress along the length of the blade, longer and longer flakes must be removed. To assist with longer flake travel, I often isolate the platforms by removing a small flake on the other side of the platform area, as seen in the pic. This isolated platform will release with a bit less pressure and travel a bit further. It will result in less bending stress
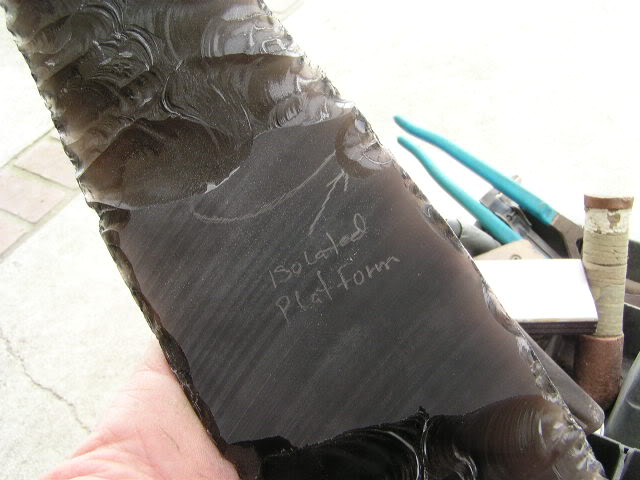
This pic shows the flake after is has been removed from the isolated platform. Right on The 2nd face has now been completely pressure flaked. All saw marks have been removed.
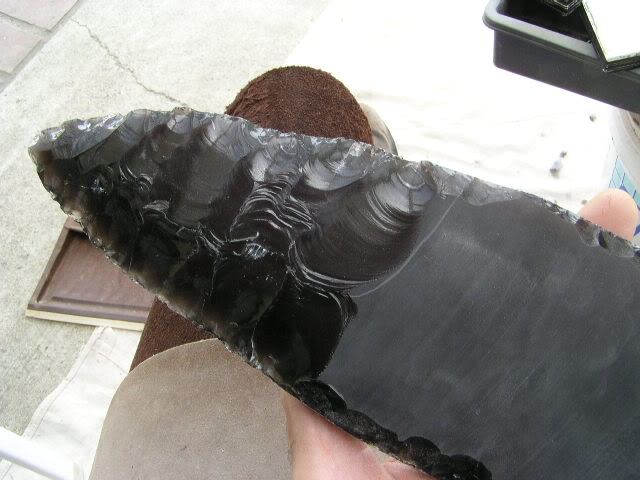
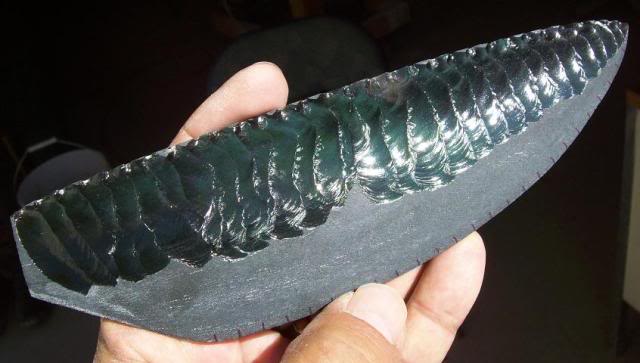
The next step is to selectively go around the blade and remove additional sequences of flakes to thin the edge and provide a good contour from edge to edge. In some area the edge may be very thick and more massive flakes will need to be removed. This pic shows such an area. Notice that I am using a finger guard made from leather to support the opposite edge. This not only protects my finger, but it provides support on the opposite edge. As I apply pressure with the Ishi stick I am applying the force directly into my finger support. This greatly reduces the bending stress being applied to the blade and reduces the chances of breakage. This also encourages the flake to travel further, often from edge to edge. The leather provides
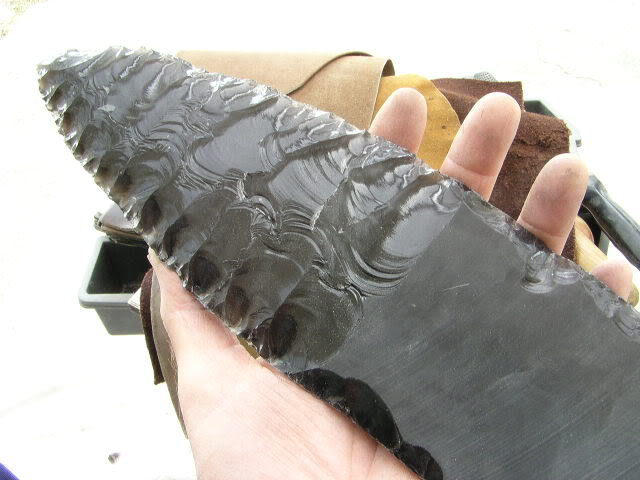
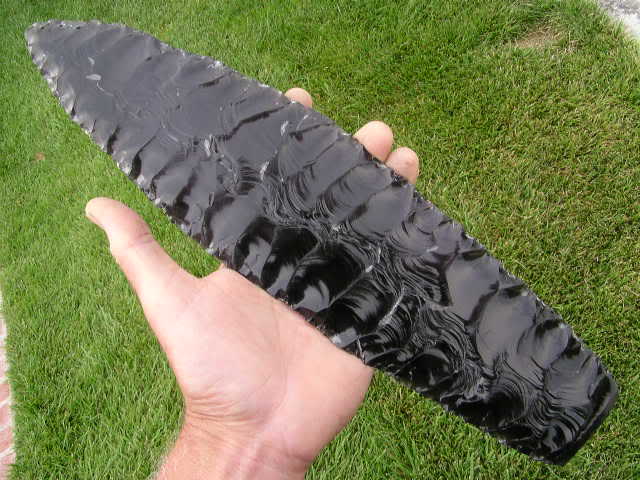
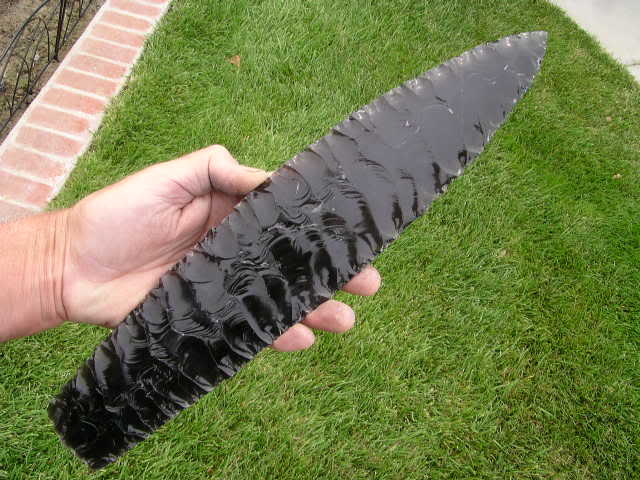
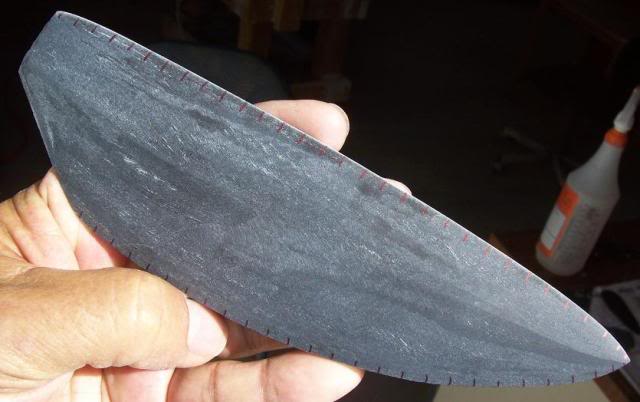
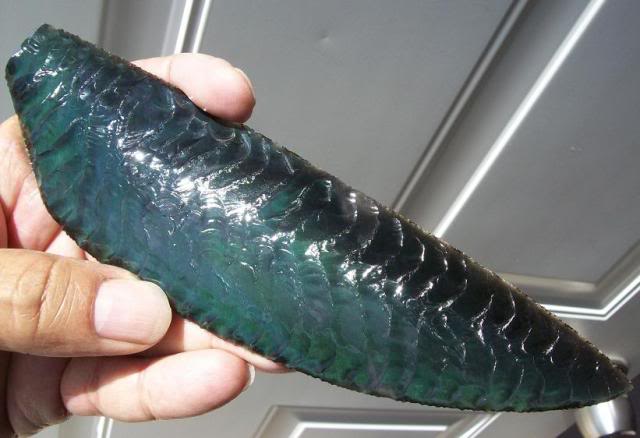
This is one side of the finished blade. It measures 14 5/8 long by 2 5/8 wide by 3/8thick.
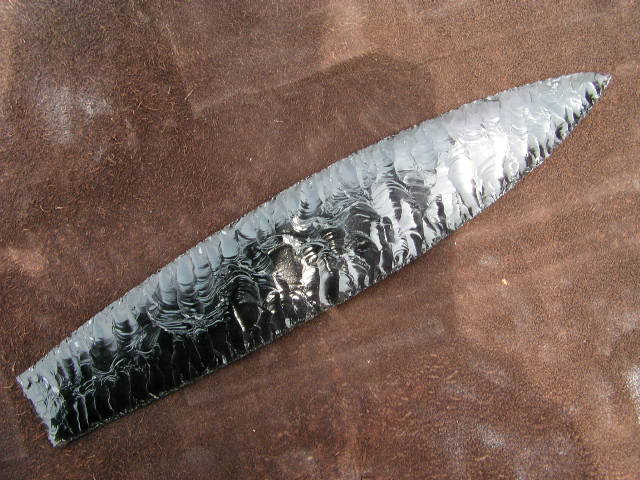
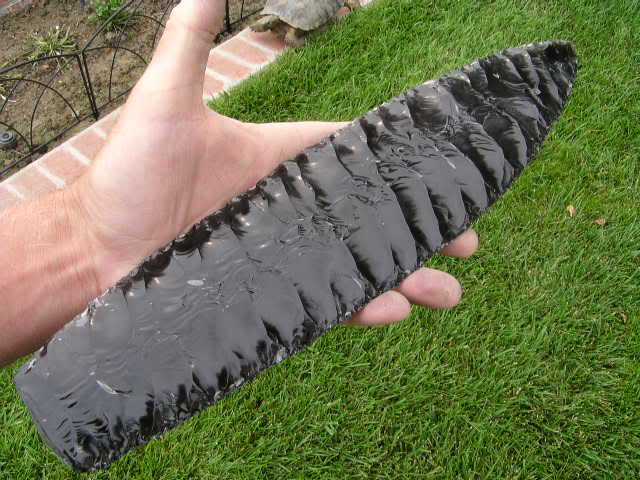
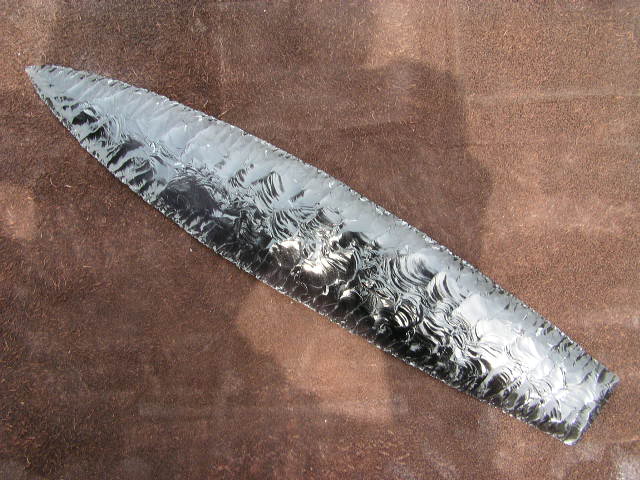
This is the other side of the finished blade.
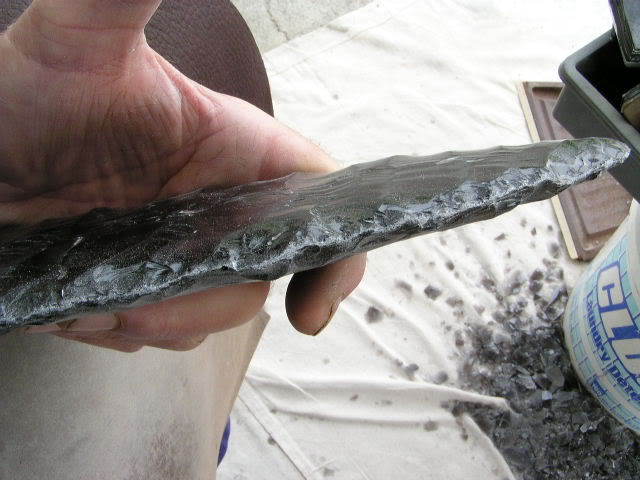
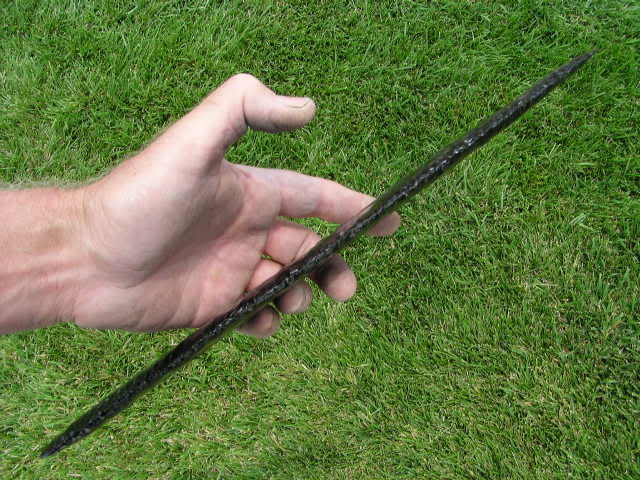
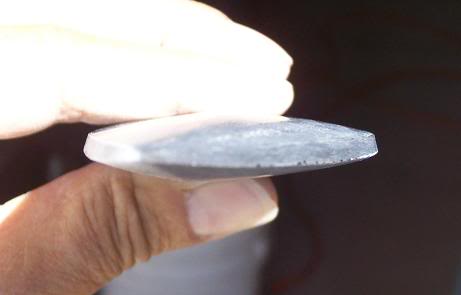
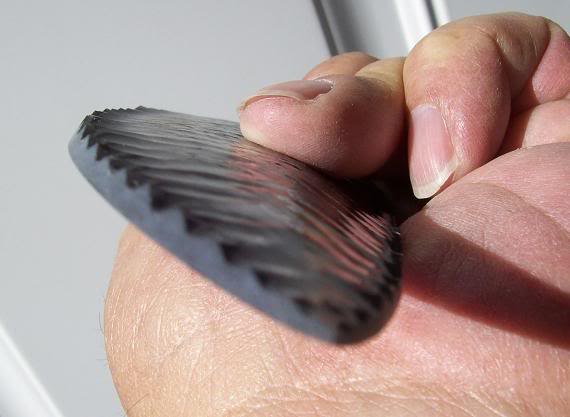
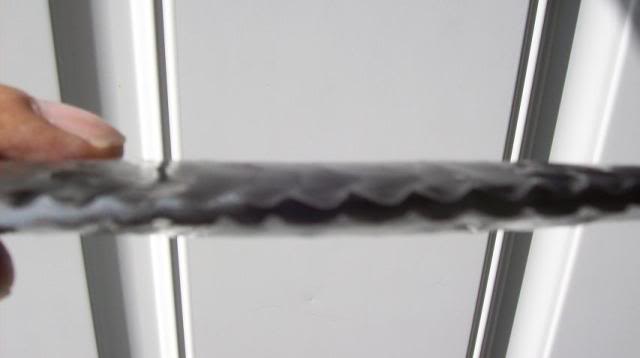
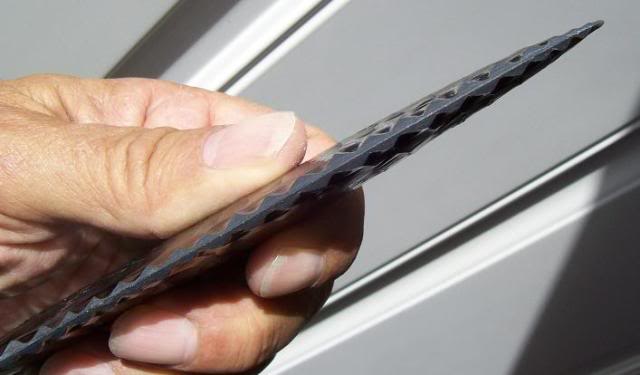
This is the edge view of the blade.
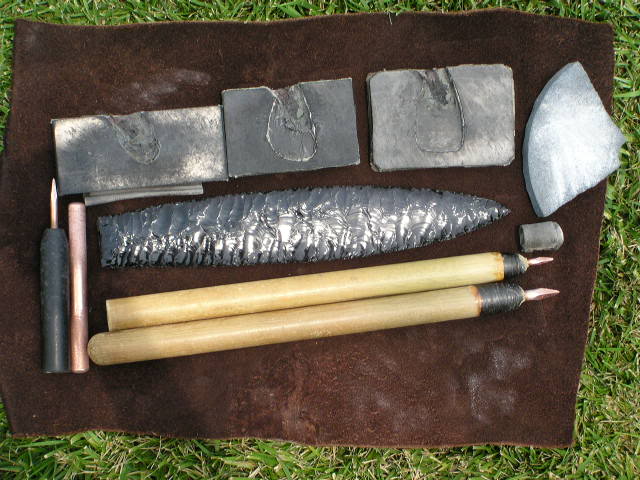
These are all the tools used to make this blade.
Hope this can be of use....jim winn From http://www.paleoplanet.net/, April 3, 2010, copied with permission
Flake Over Grind (FOG) 101
By Tom Dodge (aka peblpmp)
OK....here goes...........others that FOG may use different techniques but this is what works for me.........
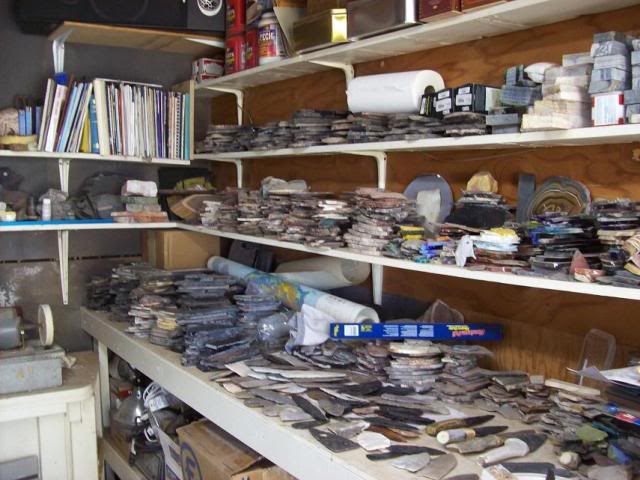
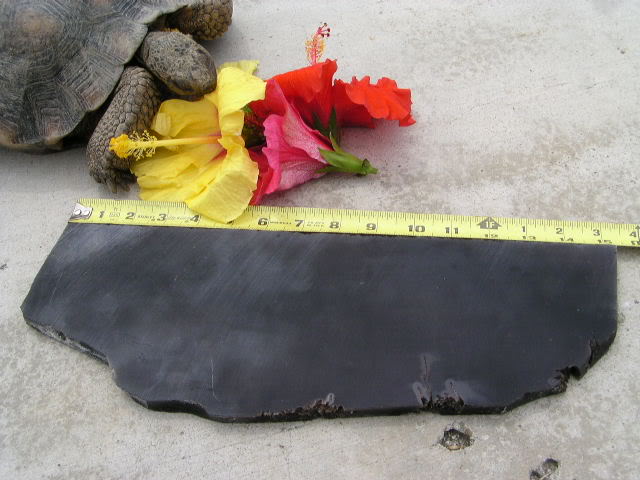
Lots to choose from..........I love cutting rock......especially obsidian..........every one is different.....in fact, every slice is different
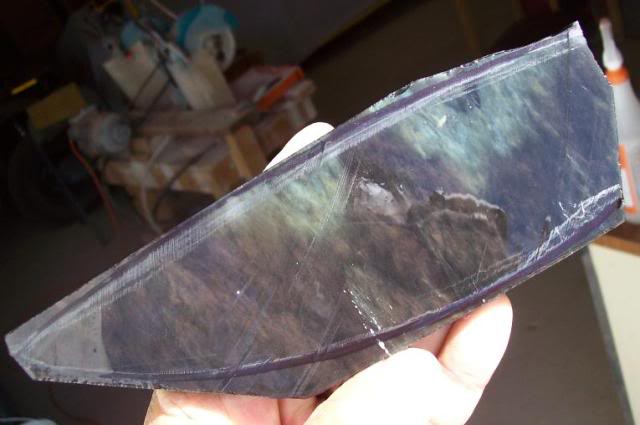
Take a slab, orient it the way you want, mark out the shape and trim with a tile saw. Closer triming here save diamonds later! I slab my own with an 18" Highland Park.
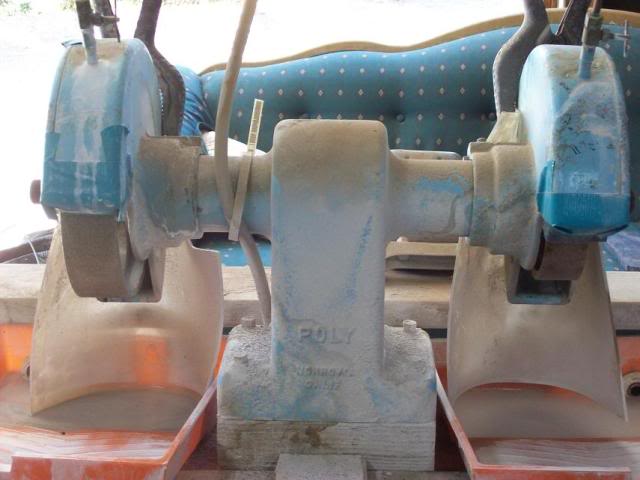
This is the work horse. 10" Poly arbor (very hard to find) with 8" 50 grit wheel and 6" 180 grit wheel.
Grind out the shape then grind both faces into a convex shape. Leaving a median ridge down the middle helps the flakes treminate smoothly. I'm not always successful. Rough it out with the coarse wheel leaving about a 1/16" flat on the edge so you don't rip the edge off. Smooth it out removing all the grind scars with the fine wheel. Start with thicker slabs to allow for grinding removal.
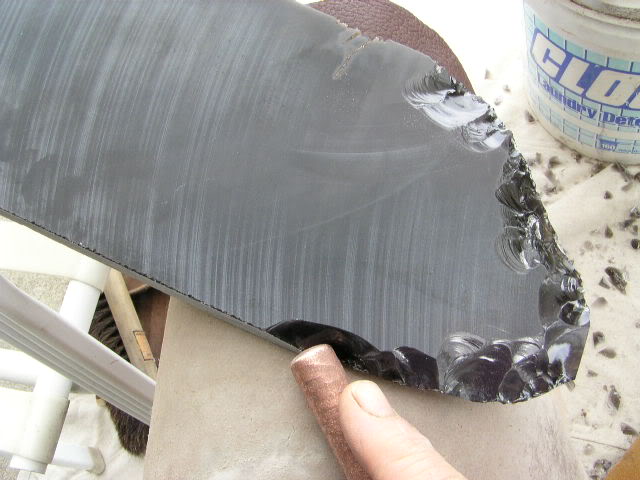
Using the fine wheel, bevel the edge at about 75 to 80 degrees. This edge should be straight with a sharp edge on the side to be flaked. This is your working edge for one face. Measure and mark, if you want to, the evenly spaced flake locations.
With fine abraider, rough up the working edge and leave the powder on as it helps the copper bite the rock. I use a slotted block and an Ishi stick to flake. Start at one end or the other always flaking into the mass (unflaked portion) side of the previous flake. If you miss a flake or run into other troubles, go to the other end and work back to the booboo; this often helps to better remove "islands" of "frog skin" you missed. Run down one quadrant, then abraid the other edge and run down it. Remember the centerline rule thingy still applies!!! Try to take every flake exactly the same, ie. same angle, same force, same depth, same everything.
First quadrant..........the thinner and misaligned flake are a result of not doing the same thing every time. It is unforgiving and takes a lot of concentration.
Second quad done......first side finished.
Back to the grinder (fine wheel) and bevel the working edge back the other way to flake the other face. Repeat above, placing the tip of flaker in the middle (the strongest part) of each delta. No measuring or marking needed as the deltas should be spaced just right.
After all 4 quads are flaked, the edge should look like this.
Back to the grinder (fine wheel) and grind down about 1/16 to 1/8" of the deltas on both sides, leaving a fairly sharp edge for the final retouch.

Retouch the edge, careful to not push in and have the flakes run up the flake scar ridges. Just take off the ground deltas. U B done...........
Other side. Not too bad.
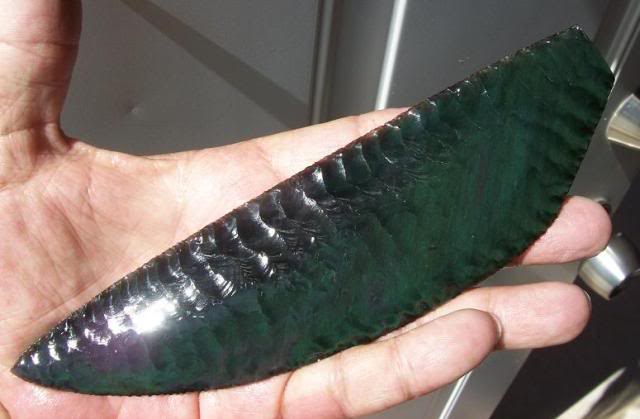
Once again I must thank the omnipresent TwoBears for the rock, which is to die for. There is no way to fully capture the amazing deep metallic glowing color of this Mexican obsidian with photos. I love obsidian.
FOG has been around about 3500 years. They (Egyptians) just didn't have diamond grinders. They did have beer. Lots of knappers scoff at FOG knapping for various reasons. I personally could care less. It helps to produce what I want to produce.
Hope this is informative for anyone who wanted to know.
FOGPimp
From http://paleoplanet69529.yuku.com/topic/23948, April 1, 2010, copied with permission
Parallel Flaking Techniques
by Jim Winn (February 2002)
Over the years, I have developed some ideas or beliefs on what seems to work when it comes to parallel pressure flaking. I may be wrong in my thinking, and invite other opinions or suggestions or what works from other folks. I am sure lots of folks may disagree with my ideas, but I welcome hearing from them so that we can all learn and improve our skills. Hopefully, maybe some of the following may be of use to others, or at least provide something to think about. Here they are:
1) Parallel flaking can be done straight in or obliquely. Either will work, but oblique flaking is more efficient for several reasons. First, the flake will travel further in an oblique direction than straight in. Why? Because the convexity is less when traveling at an angle across the face than straight in. In other words, it is flatter. All other things being equal, flakes travel further as the face becomes flatter (unless it becomes concave, or course). There is a negative side to this: Flake terminations are more likely to terminate in a step or hinge as the face becomes flatter, but measures can be taken to prevent this
2) Flakes will travel further and are more likely to have a feather termination when absolutely nothing is touching the flake as it is being removed. This is why I use a slotted hand pad, so that the flake area to be removed is resting over the slot. After each flake removal the biface needs to be moved so that the next flake is resting over the slot. If this is not done the flake will often terminate in a small fingernail hinge at the point where it meets the pad.
3) The biface is less likely to break during heavy pressure flaking when the flakes travel obliquely across the face instead of straight in. Why? There is more mass below the flake diagonally across the flake then straight in. Also, the flake is less likely to overshoot the opposite margin because the distance is greater. There is one time when this does not apply, and that is when removing flakes close to the tip when the flakes are traveling back toward the tip. In this case the flakes travel a shorter distance and great care must be taken not to overshoot and break the tip off. I have found that placing the tip of the biface on the pad (not over the slot) works well to prevent tip breakage until several flakes have been removed. Why? 2 reasons. One is that the tip is now supported and less likely to recoil and snap. The second is that the pad is touching the flake and prevents it from traveling as far. It may terminate in a fingernail hinge, but this can be removed when working the other edge, from the tip to the base.
4) Either an Ishi stick or a simple hand flaker can be used to do oblique parallel pressure flaking. But only an Ishi stick can remove massive long pressure flakes. Why? Because tremendous pressure can be applied with the Ishi stick, using not only the arm and leg muscles, but the chest, shoulders and back also. (In fact the whole body can be used with the Ishi stick in the traditional manner between the legs). The closer to the crotch, the more power that can be developed, and in addition the more stable everything is. I find the hand flaker more suitable on the smaller points where great pressure is not required and I am sometimes able to get more accuracy with it. Also, the hand flaker can be twisted at the moment of flake release to increase the travel of the flake. But the Ishi stick is a must on the big knife blades (unless your doing percussion of course).
5) Beginning knappers sometimes have trouble getting the flakes to travel as far as desired. They place all their strength into it and still the flake peters out short. Why? Sometimes it is a matter of strength, but more often I believe the cause is insufficient support of the biface, such that it rotates in the hand. The knapper is pressing with all his/her strength with the pressure flaker while the hand supporting the biface allows the biface to rotate slightly. The pressure now is directed outward instead of straight in, it travels a short distance but not to the middle of the point and the result is a thicker biface. The cure is to concentrate on supporting the hand holding the biface such that it remains absolutely fixed while the pressure flaker is applying pressure. The pressure flaker must apply force nearly straight in for a long flake and not be allowed to tilt outward. Again, supporting the hand close to the crotch and on the inside of the leg provides great support. If the knapper is straining and allows the hand to leave the inside of the leg the hand supporting the biface has to rely on the arm muscles alone for support and arm muscles are simply not strong enough to provide fixed support (unless you have 20” biceps!). Basically, the flake will obey the rules of physics and travel where ever the force is directed.
6) Parallel flaking is more efficient than random flaking (both on percussion and pressure). I am not saying is it right or wrong, just more efficient. Ancient knappers used both methods and of course random flaking is the only appropriate method when duplicating certain point styles. Random flaking must of course be used in the early stages of biface reduction to remove unwanted mass which is randomly located. However, by stage 3 or so, ridges can become established and oriented so that successive flakes can follow the ridge left by the remaining flake.
7) When doing parallel pressure flaking it is not necessary to travel all the way from tip to base or visa versa until the final set of pressure flakes is to be removed. Just continue the flaking sequence where mass needs to be removed. If you hit a low spot, skip past it and start where the next mass needs to be removed. Otherwise the point will be bent or twisted when viewed sideways. This was a problem I had in the early days when I would keep going from tip to base and then wonder why the point was not flat! Even on the final set of flakes it is not necessary to travel continuously if there is a low spot and often skipping over it will not even be noticeable (unless you are doing FOG, in which case there wont by any low spots anyway). Also, when doing a sequence of flakes, try to adjust the length and thickness of each flake to the amount of mass needing to be removed.
8) Longer flakes are wider flakes. Guess this is obvious! But the spacing needs to be increased between flake removals to prevent the flake from diving into the previous flake scar. I still make this mistake when I don’t take the time to inspect each flake removal and adjust the next accordingly.
OK, that is all for now. Lets hear from others. Give me some hell! Really, I know there are probably lots of ways to do things better that I have not thought of, and I think that is what this forum is all about, sharing and learning from one another to improve our skills. Perhaps a folder can be created on pressure flaking tips, another on percussion flaking, fluting, etc.
Copyright © 2004 Jim Winn
From http://www.flintknappers.com/oldsite/jim_winn_parallel_flaking.html, April 8, 2010, copied with permission

Micro Flint-Knapping
by Craig Libuse
Scaling traditional techniques to extremely small sizes
Dan White (pictured) has been able to create his own form of art, based on what was one of the first forms of art—flint-knapping (shaping stone by breaking off chips). He calls it "micro-knapping". Prehistoric cultures learned early on that flint could be chipped to create sharp edges for knives, arrow and spear tips. The ability to make quality points was critical, as it meant the difference between eating and going hungry. Shape and size varied widely based on use and culture, but the technique has changed very little in thousands of years. Old points are popular among collectors, and some modern
craftsmen have taken to duplicating the ancient techniques, but Dan has taken it to the extreme small end of the size scale.
Over the last few years Dan has made over 100 miniature stone arrowheads. He uses a stereo microscope to reproduce the stone-age technology of flint-knapping in miniature. After months of experimenting, headaches, and stabbing himself in the fingers, he has been able to develop a technique where he can make miniature stone arrowheads the size of a grain of rice that have all the same proportions and flaking as the full-size originals. Each miniature takes between 1 and 2 hours to complete.
Tools of a new micro-trade
His tool kit consists of a thick rubber pad, a fine grinding stone, various size small nails/pins for use as pressure flakers and Scotch tape. (He must wrap his finger 4 or 5 times with tape to prevent the smaller nails from stabbing him while flaking). He like to use the most colorful stone he can find for his microscopic arrowheads. First, he starts with a flake of stone about the size and thickness of a nickel. He then begins breaking off large chips with a sharp copper nail to shape the stone down into a bi-facially flaked "pre-form". Once the pre-form is complete it's time to use the smaller nails and pins to shape it down and begin finishing the edgework and notching or fluting. Notching is done with a small nail that has been flattened and sharpened. He makes all the pressure flaking tools with the help of a microscope. Microknapping is basically the same as normal flint-knapping in the way each flake has to be removed in a very similar and precise manner.
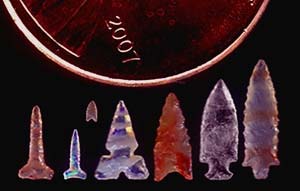
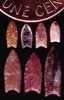
Seen here are some of Dan's favorite micro points, described from left to right: 1- A T-drill style point made of Kaolin flint from Oklahoma. 2- Another T-drill style made of opal from Australia. 3- His smallest point- a paleo style fluted point made from Alibates chert from Texas. 4- An arrowhead made from striped opal from Australia. 5- A Dalton-style made from Kaolin from Oklahoma. 6- A "bolen bevel" style point made from quartz crystal from Maryland. 7- A stemmed point made from Brazilian agate.
Scarcity of materials leads to miniature craft Dan has been a collector for most of his life and his interest in ancient stone arrowheads is what eventually lead to his pursuit of flint-knapping. When he first started trying to make arrowheads he had no way to get large pieces of flint to practice with, so he decided to make miniature arrowheads using tiny pieces of stone that had broken off some damaged arrowheads in his collection. As far as he knows, he is the first person to ever try flint-knapping under a microscope. Since he had never heard of this before, there was no place to go for guidelines or advice.
It took several months to develop his technique and figure out the right tools to make. After much practice and pain, he was able to make a miniature arrowhead under 2 mm long that has sharp edges and is flaked on both sides just like the full-size ones. His smallest arrowhead was considered for the Guinness Book of World Records, but because there is no category for arrowheads or flint-knapping (and they didn't feel like creating one) he was turned down. However, some of Dan's work is in the Smithsonian collection and his smallest piece has been photographed by the Smithsonian's photographer. He has sold some individual miniatures to collectors in the past but would rather keep most of them and enjoy them himself, especially since they are so difficult to make.
Early difficulties solved by better tools and techniques When Dan first started, his only tools were the microscope, a pin for the notching, a pocket knife and some card paper. He would find the thinnest, flattest chip of stone and then shape the edges down with the tip of the knife blade while holding the stone between his fingers in a piece of card paper. The first 10 or 15 were crude looking and not bifacially flaked (flaked equally on both sides). He used the pocket knife for a while before realizing he could never get the results he wanted (bifacial flaking) with such a hard chipping tool. This is when he started using nails and placing the stone on a rubber pad to get longer pressure flakes.

One of Dan's arrowheads is shown here attached to a miniature arrow.
When starting out and trying to teach himself how to make these tiny points, Dan would break two or three for every one he finished. After finally getting the tools and technique just right, he says he can now make two or three (if he's really careful) before he breaks one. According to Dan, "The hardest part is doing the notching and the flute flakes for the Clovis style points. Naturally, most of the breaks happen after much of the work is already finished. If I can get the arrowheads to look good under the microscope, they will look really good to the naked eye, but sometimes I break them on purpose if they don't look just right."
Dan admits that he has dropped a few of them and lost them in his carpet including a couple of his best ones. After spending over an hour looking for one he has to give up in frustration. Even so, he says working this small is worth it.
Here are several examples of Dan White's work:
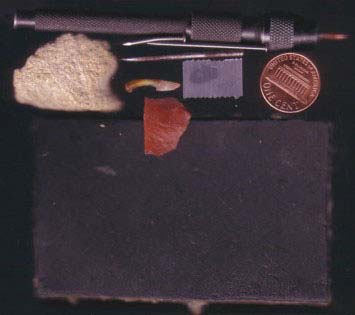
Dan's tool kit includes:
- A stereo microscope (it's a lot harder to make micro arrowheads without it but it can be done).
- A pressure flaker with a sharp copper nail for making the pre-forms, and some smaller pins and nails for the finer chipping work. Also there's some clear tape used to protect his finger from being poked by the nails while pressure flaking
- A small grinding stone used to grind the edge of the pre-form prior to chipping
- A rubber pad cut from a tire for placing the point on while chipping. On the pad is a red piece of stone typical of the size and shape he likes to start with.
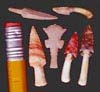
The penny is to show size. The small hafted knife in the center has a turtle bone handle with real sinew keeping the blade on.
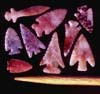
Some arrowhead samples of various shapes are shown next to the tip of a toothpick for size reference.
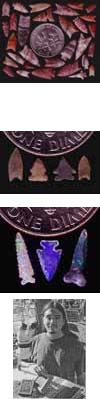
More small points, all of a similar style are shown next to a penny.
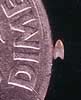
This is Dan's smallest arrowhead, a fluted and bi-facially flaked Clovis-style point that measures just over 1 mm. According to archeologist Dr. Dennis Stanford at the Smithsonian and the people at Guinness Book of World Records, this is the smallest knapped stone arrowhead they have ever heard of. This is the only one he has made this small and says he doesn't think he wants to try it again. He made it several years ago and had to hold it down on his pad using a popsicle stick while flaking it with a special tool he made just for this point. It took about 1-1/2 hours to finish.
These points are all made from Alibates flint found by Dan's late friend George Chapman near Alibates Flint Quarries National Monument, the famous ancient flint quarry in the Texas panhandle. George lived near the quarry and he would send Dan a pile of small flakes he picked up in exchange for a finished point or two. Dan says this is some of his favorite material to work.
These are some of the first ones Dan made from broken pieces of arrowheads. All are made from a thin flake and are only chipped on the edges.
These three glowing "opals" are all made from Australian Opal from Lightning Ridge.
He has only one picture of himself at work with his microscope. It was taken by Val Waldorf in August, 2002 at Flint Ridge, Ohio for the October, 2002 Chips publication for flint-knappers. (Vol.14, #4) Dan has created other weapon shapes as well, from spear points to daggers. The handles were made out of tiny bones found in owl droppings.
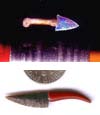 A knife with an arrowhead-like point made from fire opal.
A miniature knife of the type chipped from obsidian.
From http://www.craftsmanshipmuseum.com/White.htm, April 7, 2010, copied with permission